Showing posts with label scrappy quilts. Show all posts

Sunday, December 29, 2013

Just Add Color

Almost time to begin my new adventure.... 
Life’s A Journey—Applique Mystery Quilt A-Long—2014

Are you ready to create your own stunning wall-hanging quilt? Then… bring along your imagination, sewing skills, and a basket of fabric scraps or pieces; to unravel this online applique mystery and enjoy a captivating quilting experience, with a delightful group of quilters, that have joined—from around the world.

This 17-week project will enable you to create a unique and special quilt that should evoke special memories to cherish—whether it is for yourself or someone you love.


It is my hope, that this project will be a nice distraction from winter; for anyone that finds the many months of cold and snow, a complete drain on the living—really only perfect for quilting!!


For new information and to follow along; I plan to use twitter to post when new things are happening; and adding to my blog to make the weekly lessons come to life. Feel free to join me; to see what's new. 

To join, check out this adventure with the pattern download at my Craftsy store. Particular information and finished blocks will only be available to those that have joined; it closes 31-January-2014.


APPLIQUE QUILT BLOCKS
Everything we experience brings us different results, as we journey through this lifetime—some are happy; some are sad; some belong to us; some only to others; and some we all share in common.

Therefore, each applique was chosen to evoke either a special memory or dream, in our minds; and then transform these chosen black-and-white images into colorful quilt blocks. If nothing significant translates, find an image with colors you love.

When selecting colors; I suggest:
  1. Using lighter colors for the background to allow the applique to standout on the block. (Or vice versa, if you like lighter images and a darker background.)
  2. Focus on the design--week by week--and create the perfect applique with colors that bring forth the intended memory it evokes, one block at a time.
  3. This will create the ultimate scrappy quilt in colors that bring each design to life.


JUST ADD COLOR
As a child, I loved coloring books. Those black and white pages were just waiting to be transformed by creative imagination and a box of crayons, each time they were opened.

Therefore, I have taking this concept a step further with a grown-up twist…using applique and quilting. By replacing those coloring book pages and crayons with a scrappy quilt pattern and colorful cotton fabrics; bringing along that same creative imagination to create a delightful scrappy wall-hanging quilt.

As this is the last post for 2013, I wish you all a blessed and Happy New Year…2014!!

Join me for the first installment of this scrappy applique mystery quilt a-long on Sundays, beginning January 5, 2014. Check back then; to begin this creative journey.


Cheers... 


Monday, February 13, 2012

Colourful Spools

The Project: Runaway Thread
--PART THREE--

As one would normally create the blocks that make up the quilt top first, and then add the borders, this project allowed for a change in this process. This pattern works... no matter in which order you wish to do things....  So even though instructions still need to be followed, no one will know you changed things up.

I just happened to do it in reverse, as the blocks for the border are smaller and more of them. So you can see, that my wish was to finish this quilt top successfully, rather than getting tired and being stuck with an unfinished top.


Main Block Construction
 
These begin with 6.5" background fabric squares. Then adding scrappy squares to create the spool. When you look at the overall design, the spools in the border are created with the light fabric and the center spools with the scrappy fabrics.

To complete the blocks, they are created the same as the border blocks; however, the fabrics used are just done in reverse. The scrappy fabrics will create the spool, after assembly.

Adding Scrappy Blocks

Cutting Off Extra Fabric

Block Placement


Ooops... Fixing A Dilemma!

Only at this point, did I discover that I had three of these pieces...


 when I actually needed three of these pieces...


If I had not cut off the extra fabric on the blocks, all I would have needed to do was separate the larger scrappy piece and be done. However, since I had cut them, I had to adjust these blocks by thinking up a way to do that...

Not having enough leftover fabric to just cut three more blocks, I decided to add the same background fabric, creating a seam where there actually shouldn't have been one.

Replacing Corner


Now that I had make the adjustments, I could have stopped there. However, to make it look like less of an error, I did the same for all four corner blocks, and the two center blocks on the left and right sides of the quilt top.

Adding Balance at Side Center

Center Blocks Complete


Now, here one could have just added several plain borders until the size was what you wanted. However, the pattern is designed with a more creative touch... a unique block border creating a reverse effect from the center blocks.

Don't you agree, that simple borders would not have been as pretty as this one, here!

Fancy Border Added


I definitely enjoyed this project. There are lots of fun projects in this book. And, since I have more scrappy squares I'll need to revisit the list and see which one I'd want to make next time.

Now, if one wanted this quilt a bit larger, adding additional borders with fabric strips, would be simply easy. The image below shows how is fits on a queen size bed. It wouldn't take much to make it the proper size, if one desired. As I am leaving it as a quilt top, that could still be a possibility.... 


Finished Quilt Top

 
Runaway Thread -- (66" x 78")


Hope you enjoyed this project... until next time, have fun and do something creative!! For more on the book or the scrap therapy system, visit these links.
 
Happy Quilting,


Sunday, February 5, 2012

Empty Spools

The Project: Runaway Thread
--PART TWO--

I began with the 3" block sizes as they will be more time consuming. Then made the 6.5" blocks for the main part of the quilt. However, here I will cover only the border strips in Part Two, and then the main part of the quilt in Part Three.

 
Block Construction

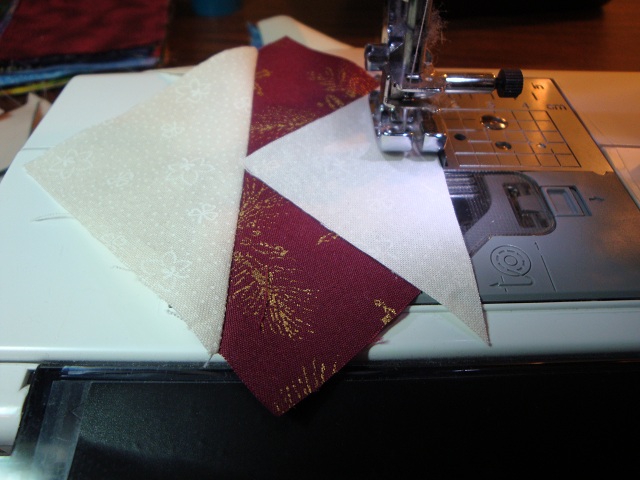
To complete the blocks, first a diagonal line is drawn on the wrong side of the background fabric (light). Then placed right sizes together with a scrap fabric block. I stitched just to the right of this line, so when it was pressed it was the proper size.

Stitching the First Corner


The instructions leave both layers as is; however, I cut them off. It worked out prefectly because I was short on the yardage and was able to use this cut off piece to do the opposite corner. I just had to align it properly to complete the blocks.

Trimming the Block Layers


Because I was using the pieces that were cut off, I did not have a square piece to align with the corner of the scrap square (as above pieces with the drawn line). I first sewed one (orange/white below) and then measured it as shown. This edge was used to align the light triangle piece so it would turn out the proper size.

Stitching the Other One


Trimming To Create The Stitching Line


Attaching the Other Corner


Border Construction

This was the first time I've ever worked on completing the borders of the quilt before doing the main part. With this pattern, this is possible as it is all calculated out for you in the instructions.

All the blocks are complete!! Next step, was to arrange all the pieces as shown in the book. Then, sewing together three blocks in rows and continue until the border strip was done.

Arranging Borders


Sewing A Row


Sewing the Rows to Make the Borders


Now that I have the rows stitched together into the final border strips, I am ready to stitch together the larger blocks for the center of the quilt. Coming in Part Three...

Ready For the Center


Next week... I will show you the remaining part to complete this quilt top. And also, show you how I fixed a serious error I had made in my block construction. 

 
Happy Quilting,

Saturday, December 31, 2011

Year In Review

A look back...

Since I had taken a quilting break through part of 2010-2011, I wasn't quite sure how to begin again. I still felt the need to stick with the materials I had on hand; and therefore, it was clear that I would need to figure out how to proceed.

Many people have already discovered how enjoyable SCRAPPY quilting was, and since that wasn't an area I had worked in, thought, why not try it!! Here is what transpired...

Click on the images or links below for more details on these projects: 
 Images--for my original blog entry   /   Links--for the designer's website/blogs


Storm at Sea
John Flynn's, "Storm at Sea" was such fun to create. I love it when any fabric choices made can still turn out a great look!!

Visit his website to see more color choices and the quilting lines used to create a perfect flow for that stormy sea.  Or check out the opportunity to attend a quilting seminar next summer, in Montana.


Fabric scraps taking over your life... then this scrappy method is just one medicine the quilt doctor would prescribe for you!!
 
 
String Quilting Primer
I really enjoyed this process... actually it is quite addicting, so be advised that this may affect you the same way!!!

Bonnie Hunter's, "String Quilting Primer" instructions are great to get you started. For more quilting fun, check out her books, free patterns, and her 10-day Bali adventure in 2012 on her website.


Here are two more inspiring sites to visit for this technique, a guild challenge and a video:  SelvageBlog, Quilty.


String-X Quilt!
Bonnie Hunter's, "String-X Quilt!" instructions are great to get you motivated to try more string quilting.

This design was fun, with the added challenge of setting my blue pieces into a uniform effect.  I still like a balanced look. Not yet ready to try going totally random.


Four Patch & Furrows

So many great free patterns on Quiltville, I had to chose a few more to try. This one used up more of those scraps.

This one challenged my color selection process, and in time, I dug up enough yardage to create the furrow section. It was a joy to make. Check out the instructions for "Four Patch & Furrows!


Scrappy Mountain Majestics!

This quilt was really fun!! This was my second favorite design from the scrappy quilts. 

Bonnie Hunter's, "Scrappy Mountain Majestics!" instructions are super easy. These start out with 8.5" blocks. There are several options to reveal different looks--like creating magic, it is!!


Crumb Chaos
I found Patti Chartrand's "Crumb Chaos" featured on the Quilting Gallery and it looked so delightful. However, this technique has my lowest votes, as it simply isn't for me.

If you have lots of tiny pieces and love this technique, the results can be truly awesome. 

Check out the tutorials for Bonnie's "Crumbs, Crumbs, Crumbs" and Patti's "Crumb Chaos" on their blogs: Quiltville, Patti's blog. 


Thanks for stopping by to read my blog!! More to come, next year!!

I wish you all a very bright future as the year "2012" dawns. May it bring peace and prosperity to all. Cheers!!

Sunday, December 18, 2011

No More Crumbs!

I have one more quilt top to show you this year. It started with crumbs... There are many great sites where this technique is explained; however, the place that inspired me started here. The project is called Crumb Chaos. For the photo that got me interested, please click here.

Basket of Scrap Pieces

After having used up a lot of my scraps, I figured I should give this crumb technique a try!!  So, with any remaining strings, I started adding bits and pieces. 

Adding Pieces to My Strings

It wasn't long before I had used up the strings and got frustrated with the messy pile, so I organized my pieces. This helped me sew up the remaining tidbits. Some pieces I cut up for my pillow stuffing, as this process was very tiring for me.

Sorting Scraps into Categories--By Size

When I first began, I thought I'd make 6.5" blocks, but it seemed a size I couldn't get too, so easily; so I opted to try 5" blocks. I had made several of these and then wanted to go smaller. That was when I decided I'd make them 3.5" in size. The really nice 5" blocks I saved, so I had 14 of these. The rest were the small size-3.5".

Blocks in Progress!

Crumb Blocks--finished size: 3.5"
 
The reason I decided to make the blocks 3.5" was to put them into a nine-patch block style. For placement of these blocks, I found a nine-patch design that I liked. With this nine-patch variation, I came up with my own layout for my crumb blocks. 

This meant I would need 196 crumb blocks. But, I was pretty much done with my scraps and tired of this process, so I replaced several blocks with 3.5" fabric pieces to complete the 49-block square, I desired. (In this example: Crumb blocks being replaced with: green, yellow, and red polka dot squares.)

Replacing Crumb Blocks with Plain Blocks

To sew them together into rows, I numbered each block. This makes it easier to get the order correct.

Numbering Block Placement


I always mark the side I need to stitch with a straight pin, so I can chain-piece them together without worry of getting block direction mixed up.  
Pins Mark the Edge to be Sewn

Here is how the finished 49-block piece turned out as shown hanging on the fridge door. (This one has 4 blue, 4 purple, 5 red polka dot pieces; and 36 crumb blocks.) 

Completed Block--49 small blocks in all!

Now, all I needed to do was sew these four large blocks together.  Oh, boy! I couldn't decide on fabrics and border styles, and finally got tired of using the seam ripper, so this was what I eventually ended up with...

Crumb Chaos Quilt Top

I added a 5" border and was able to use  four of my 5" crumb blocks for each corner. I had added a mock piping in white inside the border, and one in red polka dot around each corner block.

Mock Piping and Border Corners

Am I happy with the results... well, not really, but I am quite certain that this scrappy style isn't for me. But, I did give it a try, and that was the whole point of this adventure.


 My Finished Quilt Top
 Crumb Quilt-- (approx. size: 52" x 52")

Thanks to Patti Chartrand for inspiring me to try this scrappy technique as showcased on quilt gallery website and to Janet Wickell for the "More than a nine-patch" quilt block design.
 
If you wish to share your quilts, or the places that you love for this technique, I'd love to hear from you. Hope you enjoyed this project. Until next time... cheers to you all!!