Showing posts with label applique. Show all posts

Friday, April 25, 2014

A Final View of QAL Project

NINE-PATCH PIECED BLOCKS

The first photo shows how the quilt top without borders looks with the applique designs done ALL in black. Here, I used nine-patch blocks for the pieced blocks that were a little bit smaller than the pattern asks for; however, I was still able to successfully put it all together. With only the quilt top done; I could add borders to include or exclude the swag applique design. The appliques have not been stitched yet.


APPLIQUE MYSTERY QUILT ALONG -- NINE-PATCH
(As shown: 25 1/2" x 25 1/2" square)


With everyone having a choice of at least four different pieced blocks and using their own fabric colors for their applique designs; one can see that each quilt would be totally unique. Each quilt can tell its own story; and that was what I entitled this project: "Life's A Journey". 

The approximate finished size of this project; if using only the two borders in the pattern instructions, it should be: 33" x 33" square. Please feel free to try other layouts and color choices for more new and exciting story telling... using colorful fabrics and thread. 

* ** *** * **** * *** ** *

SCRAPPY PIECED BLOCKS

I wanted to have you see that going totally scrappy will still create a stunning quilt. I even used only one thread color for the complete project. If I don't have enough fabric in a specific color grouping, I can easily select new ones, and still come up with a beautiful arrangement with these quilt blocks.

And even when I messed up; I was still able to continue. Or when I changed my mind, it still was possible to make adjustments. That is what is great about quilting, one can make changes or adjustments; if the need arises.
  1. While the pattern needed a three-inch cut for the second border; it was late when I was cutting out my own; and I forgot to add the seam allowance to the finished measurement; so mine ended up narrower than it should have been; because I hadn't written out the final instructions, at that point.
  2. I wanted to brighten up the quilt with bright borders; however, the pink was too much for me; so I added the brown to tone it down. 
  3. Before finishing up the final hand-stitching of the hanging sleeve and quilt label, I auditioned buttons and added them to several of the applique designs.  


Here’s how my quilt turned out...

APPLIQUE MYSTERY QUILT ALONG -- SCRAPPY BLOCKS
(Size: 34 3/8" x 34 3/8")
** *** **** * *** ** *

Closeups of some of the appliqued blocks:

Block 7 -- Potted Flowers (embroidered stamens)

Block 5 -- Fence (with Flowers)

Block 5 -- Fence with Flowers (button centers)

Block 11a -- Boat 


Thank you for joining with me to make this applique mystery quilt along project to brighten up those long winter months. The weekly lessons will be available on my website until May 18, 2014.

Happy Quilting....


Friday, February 21, 2014

Flowers for the Fence Applique

Having some time to check out the applique blocks already completed, I wanted to see how adding more color to the fence could be done. Originally, I just left it as the block appears in the quilt along. However, I did mention you could add flowers, if you wished.


Flowers can be added in a variety of ways:
1) using purchased flower decoration,
2) with embroidery stitches,
3) using appliques,
4) creating delightful flowers using buttons.


WEEK FIVE -- Applique Block

When I shared this quilt block with my sister, the first thing she said was, "it needs flowers".  And so I knew I'd have to come up with something to suit this block before the blocks were joined together. She was in agreement that it looked so much better once the flowers were applied! Take a look....

BLOCK 5: Fence Applique


BLOCK 5: Fence with Flowers


So, I just wanted to share this block from week 5; and if you want to use these flowers on your block, I've included a PDF under the February lessons on the website.

Enjoy the quilt along journey....


If you want to see my quilt blocks done so far, check out the Gallery Page on my website. And, if you can; share your quilt blocks on Facebook; or if you don't have an account there, you could email them to me. And, I can put them up there, for you.


Happy Quilting....


PS February winners for the SHARE THE LOVE Prize Draw were chosen. Please contact me, if you have not already done so. Thanks.  (info@darlee.ca)


Friday, February 7, 2014

Fused Applique Mini Tutorial

Now that the nine patch, four patch, and scrappy blocks; have been reviewed, let's take a closer look at the fused machine applique technique.


Applique Blocks

I have seen lots of very creative applique blocks come in on Facebook, already; however, for anyone that is new to this technique or would like a more detailed approach, here is a mini tutorial using our Week 6 applique design.

Once the PDF is downloaded, the template page(s) printed, and your fabric selected; you are ready to follow these steps:

Fusible Web:
1.)  PREPARING THE TEMPLATES
Follow instructions provided with the fusible web product you are using.  (Here I am using Wonder Under by Pellon.)

With the template page face up underneath the fusible, trace out each design. Draw on the paper-side of the fusible, as all my templates have already been reversed. If you draw on the other side (web side), they will face in the opposite direction, from what the pattern applique layout shows. (If your images face the opposite direction, that is okay too.)

To help identify all those pieces:
--Write on its corresponding letter or number.
--Draw on directional arrows, when needed (for proper placement on fabric prints.)
--When doing more appliques at the same time, separate them into Ziploc bags, for easy storage and retrieval, when ready to begin each block.
Additional things you can add (where pieces are large enough or where necessary):
--Template parts: head, left arm, right foot, etc.
--Color of fabric you want to use (so when you go to place pieces you're using the correct fabrics).
Once the images have been traced; cut them apart either separately or as a group (if they are going on the same fabric). I prefer to leave a narrow white edge around the hatched lines, to make accurate cutting easier.

I find the fabric is less flimsy to cut when you cut through both the fabric and fusible web paper. If you need to release an edge to aid in removing the paper, this makes that easier, as well.

My preferred fusible was Steam-a-Seam 2; however, since it isn't available at present, I am using 805 Wonder-Under by Pellon.  The one problem that I have is getting the paper off the fused applique. So, this is what I do; and it de-stresses this process:

1.) Slide the tip of the seam ripper in between the paper and fabric to loosen one side or corner for easier removal, once the piece is cut out. (Depth: about 1/4".)
2.) Place a pencil mark at this location, to instantly know which side you've lifted. Because as sure as anything, when it comes time to separate the paper and fabric, you'll probably not remember which spot you separated. (This easily happens when doing a lot of pieces, at the same time.)
3.) It is best if you do it before you trim the piece, as the extra fabric on the edge gives it more stability.
4.) Since one cannot loosen too much on very small pieces, we want at least half of the piece to stay fastened to allow for cutting out the design.
Releasing Edge of Template

Recommendations
--Use a permanent marker instead of a lead pencil. Why? It doesn't rub off and get on your hands, while working or while using the iron. The lines are easy to draw and see; and will not fade as much as a pen or pencil mark does.
--I like to use a hatched line when tracing out my templates. This eliminates the need to use a ruler, which needs to be wiped, or else collected ink from the edge can smudge other  template pieces as the ruler is moved about. Also, one need not worry about an unsteady hand, causing crooked lines, as it is easy to lift the hand when tired, and then continue tracing.   
--If drawing circles is difficult, you could also use an item the proper size, and trace around it; (IE: bobbin, spool, plate...) 
--Use a small piece of masking tape to help secure your page to the table, as you trace out the templates, when appropriate.


Fabric:
2.)  FUSING TEMPLATES TO FABRIC
Select the fabrics you will be using; press if necessary to remove wrinkles.

To aid in applique placement, you can mark the center of the block, but adding a crease line vertically and horizontally on the block.

Marking Center of Block With Creases


If there are many pieces to layer in a design, you can carefully do a quick press (iron down, iron up) with the iron, then continue adding more pieces, to keep them from sliding about. Then fuse all when ready. (However, only do this when you know you have pieces where you desire them.)

Only fusible with sticky backs can be re-lifted and re-arranged during the placement process. That is why so many people liked Steam-a-Steam 2. (Wonder Under does not have a sticky back.)

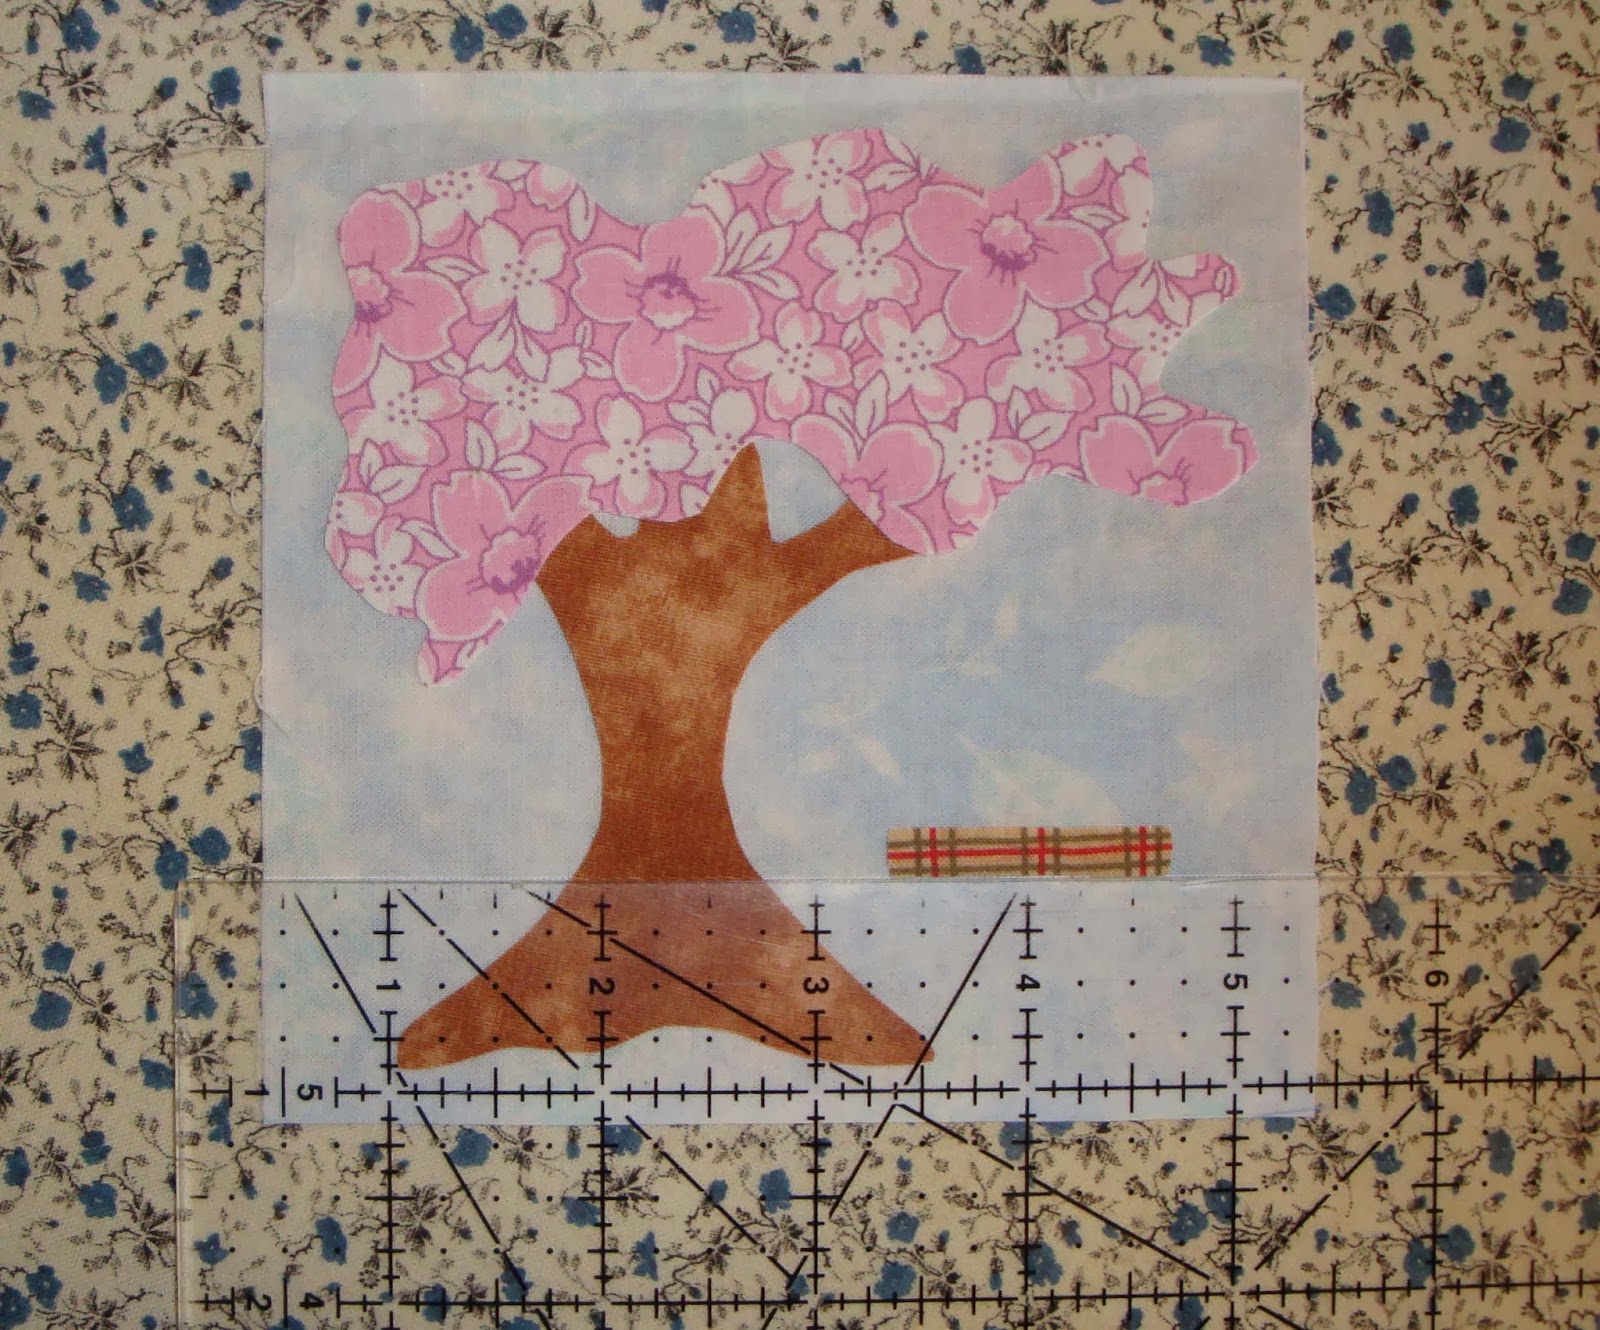
To get pieces to align properly while arranging them on the quilt block; use your rotary cutting ruler (or any clear ruler) to keep them straight. This way you can see through the ruler and ensure your design is placed where you want it.

Using the Ruler to Place the Swing's Seat

Recommendations:
--Where many pieces cross, I sometimes like to fuse on the bottom pieces first; go stitch them on; and then go back and add the ones on top. This is helpful when you are changing thread colors; or when it is more difficult to stitch the bottom piece(s) without affecting the piece(s) that overlaps it.
      
Two examples might be: 
(1) A railroad crossing... Stitch around all the short pieces; and then, add the long pieces.
(2) A grouping of flowers... five in the design with three in the background. Stitch on the three in the back row; and then add the final two in the front row. 


Embellishing the Blocks:
3.) PREPARING APPLIQUE BLOCKS
Sometimes, you will want to add extra elements to the applique that are not made from fabric; such as: extra rows of stitching, buttons, lace, rickrack, bias tape, etc. to embellish the quilt blocks.

Stitching Lines:
A machine-stitched line is quick; and works much better when an applique piece would be so narrow it would not really be worth the trouble. (Like the swing's rope here.) You could also do this step by hand with an embroidery stitch.

It will depend on the color of your fabric; however, in this block we can use a pencil to draw a light line to mark the stitching line.

I like to use a 2.5 stitch length and stitch on the drawn line; with the needle down in the fabric, turn the block and stitch over the first row of stitching; and if I want more definition, do it one more time. Then, I pull the threads to the backside; and knot. (I used three lines, on this block.)

Drawing on the Lines for the Swing's Rope


Lines Ready to be Stitched

Other Embellishments:
If pieces are very small, they can be replaced with buttons, sequins, googly eyes, or fussy-cut fabrics. To embellish and decorate a block; we could add decorative stitching, embroidery, lace, bias tape, piping, rickrack, etc. 

Extra care must be taken with blocks that are embellished, as to not nick or melt the attachments, when using the iron.


Sewing the Block:
4.) STITCHING THE APPLIQUE BLOCK
Before we stitch our applique designs, we'll need to decide what:
--thread type(s) and color(s) to use
--type of stitches and size
--adding applique pieces in one or more application(s)
--any embellishments and when they are added to the block

Thread Type and Color:
Generally, it is recommended to use cotton thread for cotton fabric. But if you don't have cotton thread and have lots of other blends of thread, use them. I like the polyester/cotton blend for appliqueing. 

Color Options: 
You can match the thread to the fabric, use one thread color throughout, or use a combination of thread colors; to embellish and decorate the blocks, as you desire. I have used all three in different projects.

Types of Stitches:
I like using a buttonhole or blanket stitch in a 2.5/2.5 size; and the zigzag stitch for finishing the edges on my appliques. I do recommend using a zigzag stitch for small applique pieces. I generally use a 2.0/0.5 or sometimes a 1.5/0.5 stitch size. The zigzag stitch is also quicker, if time is a factor. And since not all machines have the extra fancy stitches, the zigzag stitch still looks lovely used on appliques.


Personally, I have no tolerance for needle-turn applique, and hand sewing I only reserve for the quilt binding on small projects; and therefore, I love this fused machine applique technique. 

I hope this tutorial was helpful, and if you have any other concerns, please email them to me. I can do another applique post, if there are enough interest. Thanks for reading....


And happy stitching....


Tree Swing Block:
5.) A FINAL LOOK AT OUR BLOCK
This is just one way to do it; as you could fuse the complete design and then add the stitching.

In my example:
The tree trunk and swing were done before the tree top was fused and stitched. Since the top of the trunk is covered by the leaves, a straight stitch can be used to get to the other side; and then continue with the selected stitch type.  (This is optional.)

Stitching the Swing and Tree Trunk


After adding the tree top; a few lines of additional stitching was added to the tree trunk. These lines were done with machine stitching. (Can also be done by hand or left out.)

Showing the Finished Applique


PRIZE DRAWS:

With Valentine's Day coming up, let's share the love....

To enter my "Share the Love" draw leave a comment on this February 7, 2014 blog post for your chance to win 1 of 3 patterns from my Craftsy pattern store. Winners will be drawn on Feb.14.

Draw Rules:
1.) Post a comment about something you LOVE about this applique mystery quilt along.
2.) Contest is open to ALL participants. (Both free and paid versions.)
3.) You must have a valid email address to claim your prize, if you are a winner.

To make this extra special: Non-participants can also play. And if your name is chosen as a winner; you will receive the February paid version, so you can join in all the fun the group is having. 

THIS PRIZE DRAW IS NOW CLOSED.


Happy Quilting....


PS... 
You can check out this blog entry for more examples of  Applique Stitching . 


Friday, January 17, 2014

Easy Precision with Four-Patch

I don't know about you; but I usually don't fuss over how wide my seam allowances are when putting together quilt blocks. It is my quarter-inch foot that decides....

Since, this is a project we each will assemble ourselves, we can use our own method of block assembly for these pieced blocks. If anyone has difficulty getting that perfectly sized block; there are ways to adjust it, so it can be cut to the exact measurements required in the pattern.


PIECED AND APPLIQUE BLOCKS
Our Five-Inch Blocks: (block size before sewing quilt top together - unfinished)
We require ten pieced blocks and six applique blocks, this size. Therefore, let's take a look at what options are available:

To make it even easier for all skill levels, to participate; I've included four options for the construction of the pieced blocks in this quilt. So, from a nine-patch to a four-patch to a scrappy block to a plain block -- all are a five-inch final measurement; before quilt assembly. Each person can choose which option to make; and it does not matter what skill level you are. Each quilt will have a unique story to tell.

Since I love applique more than piecing... whenever it does matter in the finished size of the block; I cut my pieces a bit larger, in order that they end up the proper size. I'm still practicing getting that perfect scant quarter-inch; so until then, I'll do it my own way.

So.... to continue I want to show you how to make a four-patch block using larger squares that can then be cut down to the perfect five-inch block.


FOUR-PATCH BLOCK
1. To begin, cut four 3-inch squares. 2. Stitch them together using a quarter-inch seam allowance, does not matter if it is a regular or scant seam. Carefully press seam allowances; either to one side or open. 3. Next, using a rotary ruler measure block to check size is adequate. 4. To make the cutting part easier; just place the 2.5 inch line along the stitched center seam and trim off each side.

There you go... a perfectly sized five-inch block!! Not much waste; but now it is the perfect dimension required in our pattern instructions.

1. FOUR 3-INCH SQUARES


2. FOUR-PATCH BLOCK

3. MEASURING THE BLOCK


4. CUTTING THE BLOCK


5. BLOCK TRIMMED TO 5-INCH SQUARE


NINE-PATCH SAMPLE
In my nine-patch version, I will be using 4 3/4" blocks; and show you how to adjust the other blocks to fit this quilt design's center section. This can be applied to larger blocks, just as easily. I'm hoping to have it ready in the final week of January.


One thing is for certain... that each project we make will have its own story to tell; from what fabric choices we make to the techniques we employ; and how we decide the pieces are assembled.

If your quarter-inch seam allowances are the perfect measurement, without adjustments; or you need to adjust your cutting measurements, it does not matter. Let us all play this mystery game; at our own skill level and enjoy the journey!

Thank you for joining me...
Happy Quilting!


PS....
The next mystery block available by January 19th.... check your inbox for the arrival of my second email letter that will link you to the next lesson!! Anyone that joined between January 13-17 will be added to my mail-out on January 18th. If this email does not reach you; for whatever reason, you will still be able to find the link at the Weekly Plans page on my website. 


Sunday, January 12, 2014

About the Appliques

In the Applique Mystery Quilt A-long, it's all about the appliques...


Knowing now, that we will create the pieced blocks in a variety of ways; either doing them all at once, or one per week; along with an appliqued block. Let's get to the applique mystery....

It is an applique mystery, because we will be discovering each applique block, one by one, and also where it fits on the quilt top. At times, it may seem like we are working on images that do not relate to each other; however, they are all connected with events or objects we use and/or wish to obtain in our life's journey.

Fabric colors can be chosen in a number of ways: using what's available in our fabric bin; colors we love, colors that match our applique image, or colors that bring in an imaginary theme. [For example: a spotted purple elephant, or everything from one color family.]

The main goal is to not fuss over colors; but to enjoy making each block with the fabrics we have; and remembering it is a scrappy quilt. All these blocks will be brought together when we frame them, with our borders.


APPLIQUE BLOCKS
I like fused machine applique; and if you have not tried this method before, you can check out my two free patterns at my Craftsy store, to give it a try.


Finishing the Edges
Purpose: To stitch around each applique piece to securely attach it to the background fabric.

This can be done with a blanket stitch, applique stitch, or zigzag stitch. For small pieces, I prefer using the zigzag stitch. You can use a combination of stitches on an applique block or select only one stitch type.


Thread Colors
Here, you can choose a number of options: use thread to match the applique piece, one color on all the applique pieces for the complete project, or both. I have used all of these. For the one thread color option; I've used black, dark green, gray, white, and olive green. 


Type of Fusible Web
If you haven't tried any before, check to see what is available in your area. I have always loved using Steam-A-Steam 2; however, with the problem of availability, I had to change. The product I currently use is WonderUnder by Pellon. I had a few issues with it; but have since come to terms with this option.

If you have any questions or suggestions on the applique portion, comment below or reply by email.


Other Notes
Many have had difficulties getting the password to work; or had downloading issues, so I hope we can soon all get this quilt along going.... so we start making our quilt blocks.

I have sent the first email letter (Jan.11), with a new link to a new downloading page; and hope that I can get everyone on this mailing list. Once the quilt along is closed to new participants, it will be easier for me to send a few emails to individual people, if there are still missing lessons, not received.

I will update the pattern download; and hopefully, this will help anyone that joins after January 12, a better way to get to the lessons; until they start receiving the weekly email letter that provides the links to new lessons.

I believe if a pattern is updated; a notification is sent to previous purchasers. But if not, email me; and I will get you on the correct webpage. This new webpage link will be available and stay available for everyone that joins; after Jan.12; until closing on Jan.31. (So no more password issues.)

I've planned on adding all the new addresses for each week, to the mailing list; at the time each new lesson is send out; however, I know that you want to start as soon as possible. This may be helpful.

Once, I get the email letter sent out to include anyone that has joined up over the weekend, I'll also update the pattern download. If anyone that joined between Dec.24 and Jan.10; did not receive this email letter; please email me. I will add you to this next mailing or send you the link, to the correct page.


Happy Quilting.....
Darlee


Sunday, January 5, 2014

Mystery Quilt Begins...

Let me begin by saying, WOW!! It is truly amazing to have so many quilters on this quilt along!! Thank you so much for giving this a try....

It is my hope that you enjoy this journey through the next 17 weeks. Please be assured that your favorite techniques and methods of quilt assembly do not need to be altered; just because you are following this project. Feel free to experiment with different blocks, and while you may try new methods; it is totally fine to adjust any process to fit your present ability.

As quilters, we love the opportunity to share our successes; and when things don’t go as anticipated; there is usually someone available to help. I look forward to sharing this journey with all of you.
 

Quilting Week-by-Week
Each week, we will be making the blocks together. Following this plan, means there will be no finished quilt available to guide you in color selections, optional layouts, etc., and this works out beautifully as a mystery quilt along.

However, I do have another strategy…. Not to show you these things; but to instruct you on using spare blocks that may not be the proper size; as they can still work in this design. As I discovered when I measured my blocks; they were too small. Instead of the required 5”, they were only 4 3/4” square. If only, I had used a scant quarter-inch to sew the seams! If this happens to you, I have an alternate way to still achieve the size needed. (Photos below to illustrate this option.)


Also Note: Only the first set of pieced blocks, need to be accurate in measurement – at 5” square. The rest of the quilt can be stitched with either a scant or regular quarter-inch measurement.  

If you have difficulty sewing a scant quarter-inch seam, or just like the regular quarter-inch seam better; do whichever one you have more success with, or just prefer the most. There are several options offered to allow everyone success, with this quilt project. 

When something goes wrong…. There is generally another way to utilize something that didn’t work or fit in a past project, or plan another approach. This gave me the idea to give several options for the selection of the pieced blocks; in order that everyone can be successful.

I will also be using my too small nine-patch blocks to stitch up this design for you to see a complete quilt top (without the appliques, of course); coming later in January.


Quilt Blocks Too Small
Making quilt blocks on a block of the month or quilt along, or just on your own; and come out with measurements below the required size? What do you do about these results?

Not everyone knows that a lot of quilting designs require a scant quarter-inch seam, now; instead of the regular quarter-inch seam. For me, growing up sewing clothing, the seam allowances were 5/8" wide. So, when I began quilting, I thought sewing with a quarter-inch seam was quite small; and not wide enough to hold the quilt together. And, then in 2012, I learned about the scant quarter-inch seam.

My first thoughts were, why? I already save my fabric scraps, create pretty designs with selvages, save my tiny, tiny scraps for pillow stuffing; and want to use my "fabric stash" instead of buying more fabric, that I don't really need. Even the word itself seems so negative.  But, there comes a time, when it requires at least a try.....

It was just last week, that I did some practicing to try and sew a perfect scant quarter-inch seam. I'm not sure if I've got it, yet. And, then, I don't know if I am truly ready to commit to this. So, it is up to you how to go about this; and if you have trouble with your finished sizes, I'll even show you how to overcome this situation.

WARNING: (If you like lots of rules, then you'll have to make up your own; because I can't seem to even strictly follow my own patterns; let alone expect anyone else too.)

This quilt is scrappy, has lots of options, and will be beautiful; however, you make it!!


Getting Block Size Exact
Okay, so if you are getting perfect results. Congrats! However, if you are having some difficulty, here’s my suggestion to get a perfectly sized pieced block. 

I am not a fan of the scant quarter-inch seam, just yet. So, I tried some sample blocks, to see how I could achieve the proper size, using a regular quarter inch seam. 

To begin, the squares were cut 2 1/8" x 2 1/8" wide; instead of the 2" dimensions, in the pattern. A regular quarter-inch seam was used to stitch all the blocks together. And when, trimming off the excess, there was very little to cut off. But, now this block is 5" x 5" square.

And, that's how you can get this part of the quilt ready for assembly, in week 14. The process is to make one block at a time; this way each block will have the ability to be moved around in the quilt layout, for best results. Also, if you want to mix and match pieced blocks; they do not all have to be the same type.

If you still don’t like the results, either try again; or try another option, to replace this block with another simpler block.


Photos to Measure and Trim Blocks to Proper Size--Using a Regular Quarter-Inch Seam Allowance


Nine-Patch Block

For clarity, these colors were used to allow you to see how the ruler is placed onto the center square. If size is adequate, it is ready to trim. (shown in next photo)


Place Ruler as shown to Measure


As the ruler is correctly placed (in photo above); the top and right sides can be trimmed. Then, readjust the ruler, and trim the other two sides. The block is now the correct size.


Trim off Excess Fabric


Happy Quilting...
Next week, it's about the appliques.

So... if you have questions about the applique blocks, I'll share my thoughts to assist you.


Thursday, January 2, 2014

Piecing Together An Applique Mystery

Piecing -- Applique -- and Scrappy, too ....
Set to begin on January 5, 2014!!

Are you ready to start stitching up your story on this applique mystery quilt along? Instead of using crayons and paper; you'll begin with beautiful fabrics and add recognizable appliqued images that are attached to happy and/or sad memories, and many hopes for the future.

Combining pieced blocks and applique blocks; this quilt will allow total freedom to select a wide range of colors to create a delightfully scrappy quilt, that is set to tell a story -- and being a wall hanging quilt at about 33" x 33" in size; it will stitch up in only 17 weeks.


This Quilt A-Long Project will:
1.)  
Allow total freedom when selecting your colors, any embellishing of the blocks; even has an option in block choices, and the design is flexible to allow changing the final layout, if so desired.

2.)
Allow the beginner, advanced, busy, precise, or creative quilter several main options for creating their own unique quilt.  

3.)
Provide opportunity to work on a quilt along; without the large expense in fabric needs, supplies, and sewing time, as a large project would.
 
4.)
Allow opportunity to use stash fabrics and supplies already on-hand to save money and give opportunity to anyone that wishes to take part in a quilting project without straining their budget.
 
5.)
Begin January 5, 2014 and finish the week of April 27, 2014... making a great gift for someone special; maybe it's YOU!


Soon to be stitching....


Sunday, December 29, 2013

Just Add Color

Almost time to begin my new adventure.... 
Life’s A Journey—Applique Mystery Quilt A-Long—2014

Are you ready to create your own stunning wall-hanging quilt? Then… bring along your imagination, sewing skills, and a basket of fabric scraps or pieces; to unravel this online applique mystery and enjoy a captivating quilting experience, with a delightful group of quilters, that have joined—from around the world.

This 17-week project will enable you to create a unique and special quilt that should evoke special memories to cherish—whether it is for yourself or someone you love.


It is my hope, that this project will be a nice distraction from winter; for anyone that finds the many months of cold and snow, a complete drain on the living—really only perfect for quilting!!


For new information and to follow along; I plan to use twitter to post when new things are happening; and adding to my blog to make the weekly lessons come to life. Feel free to join me; to see what's new. 

To join, check out this adventure with the pattern download at my Craftsy store. Particular information and finished blocks will only be available to those that have joined; it closes 31-January-2014.


APPLIQUE QUILT BLOCKS
Everything we experience brings us different results, as we journey through this lifetime—some are happy; some are sad; some belong to us; some only to others; and some we all share in common.

Therefore, each applique was chosen to evoke either a special memory or dream, in our minds; and then transform these chosen black-and-white images into colorful quilt blocks. If nothing significant translates, find an image with colors you love.

When selecting colors; I suggest:
  1. Using lighter colors for the background to allow the applique to standout on the block. (Or vice versa, if you like lighter images and a darker background.)
  2. Focus on the design--week by week--and create the perfect applique with colors that bring forth the intended memory it evokes, one block at a time.
  3. This will create the ultimate scrappy quilt in colors that bring each design to life.


JUST ADD COLOR
As a child, I loved coloring books. Those black and white pages were just waiting to be transformed by creative imagination and a box of crayons, each time they were opened.

Therefore, I have taking this concept a step further with a grown-up twist…using applique and quilting. By replacing those coloring book pages and crayons with a scrappy quilt pattern and colorful cotton fabrics; bringing along that same creative imagination to create a delightful scrappy wall-hanging quilt.

As this is the last post for 2013, I wish you all a blessed and Happy New Year…2014!!

Join me for the first installment of this scrappy applique mystery quilt a-long on Sundays, beginning January 5, 2014. Check back then; to begin this creative journey.


Cheers... 


Tuesday, December 24, 2013

It's A Mystery Quilt!!

Desiring a way to say 'thank-you' for all those amazing people from around the world that stopped by to check out my quilting patterns in 2013; I have this new project to share with you... as we all begin this NEW YEAR, together. (FREE to join, until January 31, 2014.)


MORE ON THIS PROJECT

This design evolved from the idea...
that a group of orphan quilt blocks that I had made, needed a place to shine; as they had not yet made it into a quilt of their own. Perhaps, it was that they weren't really very exciting all on their own. Or, maybe I had just forgotten about them. So, why not add them to a variety of applique blocks to create a really unique quilt?

Now, this to me gets more exciting... since I love to do machine applique and using fabrics from my own stash, let's make it a scrappy applique mystery quilt!!

To have a mystery, one needs a place to go to discover all of its secrets... so that was when I thought it would work great as a quilt a-long with as many people as would like to share in this adventure. Having had the joy of sharing my quilting designs over the past year; it was time to give back. And, now it is ready to begin.... Merry Christmas to all; and to all a good night!!  This gift is now ready to open on Christmas Eve.


For more details and opportunity to join me, check out my Craftsy store anytime before January 31, 2014 to join for FREE. After that it will disappear.... (it may come back; but that is still a secret)


May peace and joy descend upon you; this festive time of year!! Thank you so much for joining me in this adventure.


Friday, April 27, 2012

Tweet Tweet

I realize that many times over the past few years, I have had a lack of desire to quilt and/or blog, so if you have not seen me lately, it's because I was busy working on projects that were not quilt related.

Recently, my attention was redirected to working on a project for my sister. She wanted birdhouses, but I couldn't figure out what to do, so in the meantime, I dug out a book I've reviewed in 2010, "Nature's Elegance" by Jan Kornfeind. This was a design I really liked and am happy to have the opportunity to create it now.  This project is also the first quilt that I actually have completely finished, since doing my 2010 Quilt Challenge. 

Fabrics


Quilt chosen:  "From A Baltimore Garden Wall Hanging"

There are two quilts in this book that have birds on them, and so I was able to take elements from both projects. The first was the applique design and border choices, and the second from the other quilt was choosing to use a darker background fabric for the center block, instead of a cream print fabric.

I used a dark green thread to do the applique stitching around the applique pieces. Then, using a darker blue thread to do shadow quilting around the design; and some stitching in the ditch around the borders.  


Placing the Applique Pieces

Closeup of the Vase and Stems

Closeup of the Bird

Complete with Borders


The quilt design measures 28" x 30" in the book. Since I used fat quarters for the quilt top, not including the applique, I only needed to adjust the width of the outer border. This made the finished quilt size at 26" x 28". I also used two tiny square buttons for the bird's eyes. These I stitched on with orange thread to make them look more like real eyes.


 Finished Quilt


Happy Quilting
Cheers,

Sunday, November 21, 2010

Folk Art 2

To continue with the Folk Art Quilt... thanks for waiting for part two.


Three different ways to create the prairie point are shown in this book.
Prairie Points – 3 ways: single-fold (218); double-fold (p219); continuous prairie points (p163)

 
Construction of the Continuous Prairie Point:

The next step was to work on the prairie points that are going around the edge of the quilt. I had not seen continuous prairie points before, nor had I made them.

If I remember correctly, the strip was 4" wide, and then pressed in half to mark a center line from which to create each fold of the prairie points. Then cuts were made every two inches on both sides of the center line, alternating along the whole length of the fabric strip.

Pressing a Fold-line

Cut to the Pressed Line


Then each cut square was folded once towards the centerline and pressed, as shown on the left below. The second step was to go back and fold each triangle shape to create another triangle, shown on the right side of the photo below.  Once all the triangles were folded, all the points facing downwards were folded up to create the finished prairie point. These I pinnned and then basted along the cut edge. They were set aside.

Folding the Prairie Points in Two Steps

Basted Prairie Points Strip


Before stitching the prairie points onto the edge, several things needed to be done first. Stacking the layers of the quilt top, batting, and backing together, to do the quilting. Shown below are the center of the quilt, and the applique elements. I stitched around the star design to quilt through all the layers. Then added a shadow stitch around the complete design.

Quilting the Layers

Quilting All Around the Outside of the Design


Still having a square-shaped quilt, it was ready to mark the cutting line. I placed the pattern piece back onto the quilt and marked the edge with a pen. When completely marked, I stitched inside these marks about a quarter of an inch, and then cut on the dotted line, marked in pen.

Marking the Cutting Line

Stitching 1/4" Inside the Marked Line

Attaching the Prairie Points


Closeup of Binding


I enjoyed making this quilt. It has lots of variety; especially, with the applique techniques, involved. And this quilt makes a delightful centerpiece, if one has a place to display it. I have done lots of square-shaped quilts on this challenge; however, it is my first round one.


My Finished Project
Size: 20" diameter


This concludes my 2010 quilt technique challenge. I will try to complete the final quarter review within the next month.

Enjoy the holiday season....

Sunday, November 14, 2010

Folk Art 1

Time to reveal my last project... I chose “Folk-Art Applique Table Center” on page 160.

The project is listed under hand appliqué in the book. However, I didn’t use any hand appliqué. Instead, I used three different methods for machine appliqué.

Machine Appliqué methods used:
1. Fusible-Web Method -- using Lite Steam-A-Seam 2.
2. Reverse Appliqué -- where a seam allowance is cut inside an appliqué shape that was marked on a top layer of fabric.
3. Iron-on interfacing used as a foundation fabric -- great for crazy quilt, appliqués, and selvage blocks.

Book, Fabrics

For this last project, I am going to divide it into two parts. That way, I can dialog the process the way I wish to and still have time today to continue with my preparations for this week's exams.


CONSTRUCTION

First, I hand-stitched my layers together and marked where the leaves were to go using a yellow tracing paper. Below it shows that I machine stitched on this yellow line before the shapes can be cut out. I had three layers of fabric - top, white, yellow-green. The backing fabric was stitched on after all the applique was complete.

Stitching on the Yellow Line


The pattern was copied from the book with my printer and the pages assembled before I could transfer some of the details to my top fabric.

The Paper Pattern


Next, with a small pair of scissors I cut just inside the machine stitched lines. This was done in two separate steps as I didn't want to cut too deep and mess up the process. Below you can see one shape is cut one layer deep revealing a white fabric. The shape beside that one is cut two layers deep to reveal the yellow-green fabric.

Because the yellow-green fabric is much darker then my top layer fabric, I used a white layer in-between them so that the darker colour would not show through the lighter fabric.


Yellow-Green Leaves


After all the shapes for the leaves were cut out, I used a light coloured thread and zig-zagged around the cut edges. Also shown below are the cut-out pieces for the flowers and the red hearts.

Applique Pieces- Leaves, Flowers, Hearts


The green flowers (tulips) and red hearts are ready to attach to the quilt top. Along with the leaves, this quilt uses three applique techniques. And now that I think about it, it appears to be a very fitting finish to my year's technique challenge, in that I end with my favorite technique.

Applique Pieces Ready to Attach


The tulips are stitched to the quilt tip using the machine buttonhole stitch in a variegated thread to match the fabric. Also, you can see the zig-zag stitch around the leaves. As this is a folk-art quilt the leaves to me don't really look like leaves, but they do create an interesting pattern around the edges of this quilt.

Leaves and Flowers

Lastly, the hearts are stitched to the quilt top. I was originally debating whether to use the buttonhole stitch or the zig-zag stitch. But after trying both, I wasn't happy with either. I also considered trying handstitching them on, but of course, you can probably guess how that went.  Or didn't go!!

So, digging out my sewing machine manual, I decided to use a stitch I hadn't used yet, and that one worked perfectly. A new machine stitch and no messy results, well, that was perfect! The book calls is an applique stitch.

Stitching on the Hearts


Before stitching on the flowers and hearts, I machine stitched the star in the center of the quilt top, as shown above. First, I marked it with the yellow tracing paper and then marked the points with pins and then carefully stitched on the yellow lines.

This may look confusing, but it worked really well. I didn't want the tracing lines to be dark, so this helped me see the points where I needed to turn the fabric. After stitching it in yellow, it needed more punch, so I stitched more lines with a red thread.

The Pins Mark the Star's Lines


Next week's entry will show the completion of the construction process and final photos... Enjoy your creative time!!


More Book Titles...
If you wish to see more quilting books you can check out my website for more details. Those books reviewed are listed on the "featured" page.