Friday, April 25, 2014

A Final View of QAL Project

NINE-PATCH PIECED BLOCKS

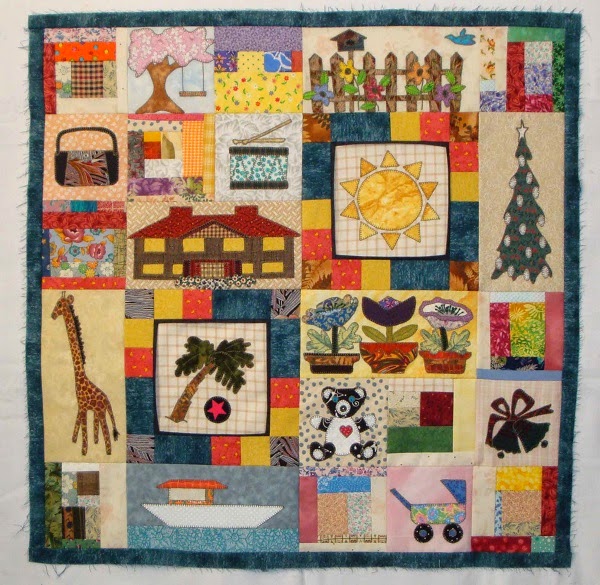
The first photo shows how the quilt top without borders looks with the applique designs done ALL in black. Here, I used nine-patch blocks for the pieced blocks that were a little bit smaller than the pattern asks for; however, I was still able to successfully put it all together. With only the quilt top done; I could add borders to include or exclude the swag applique design. The appliques have not been stitched yet.


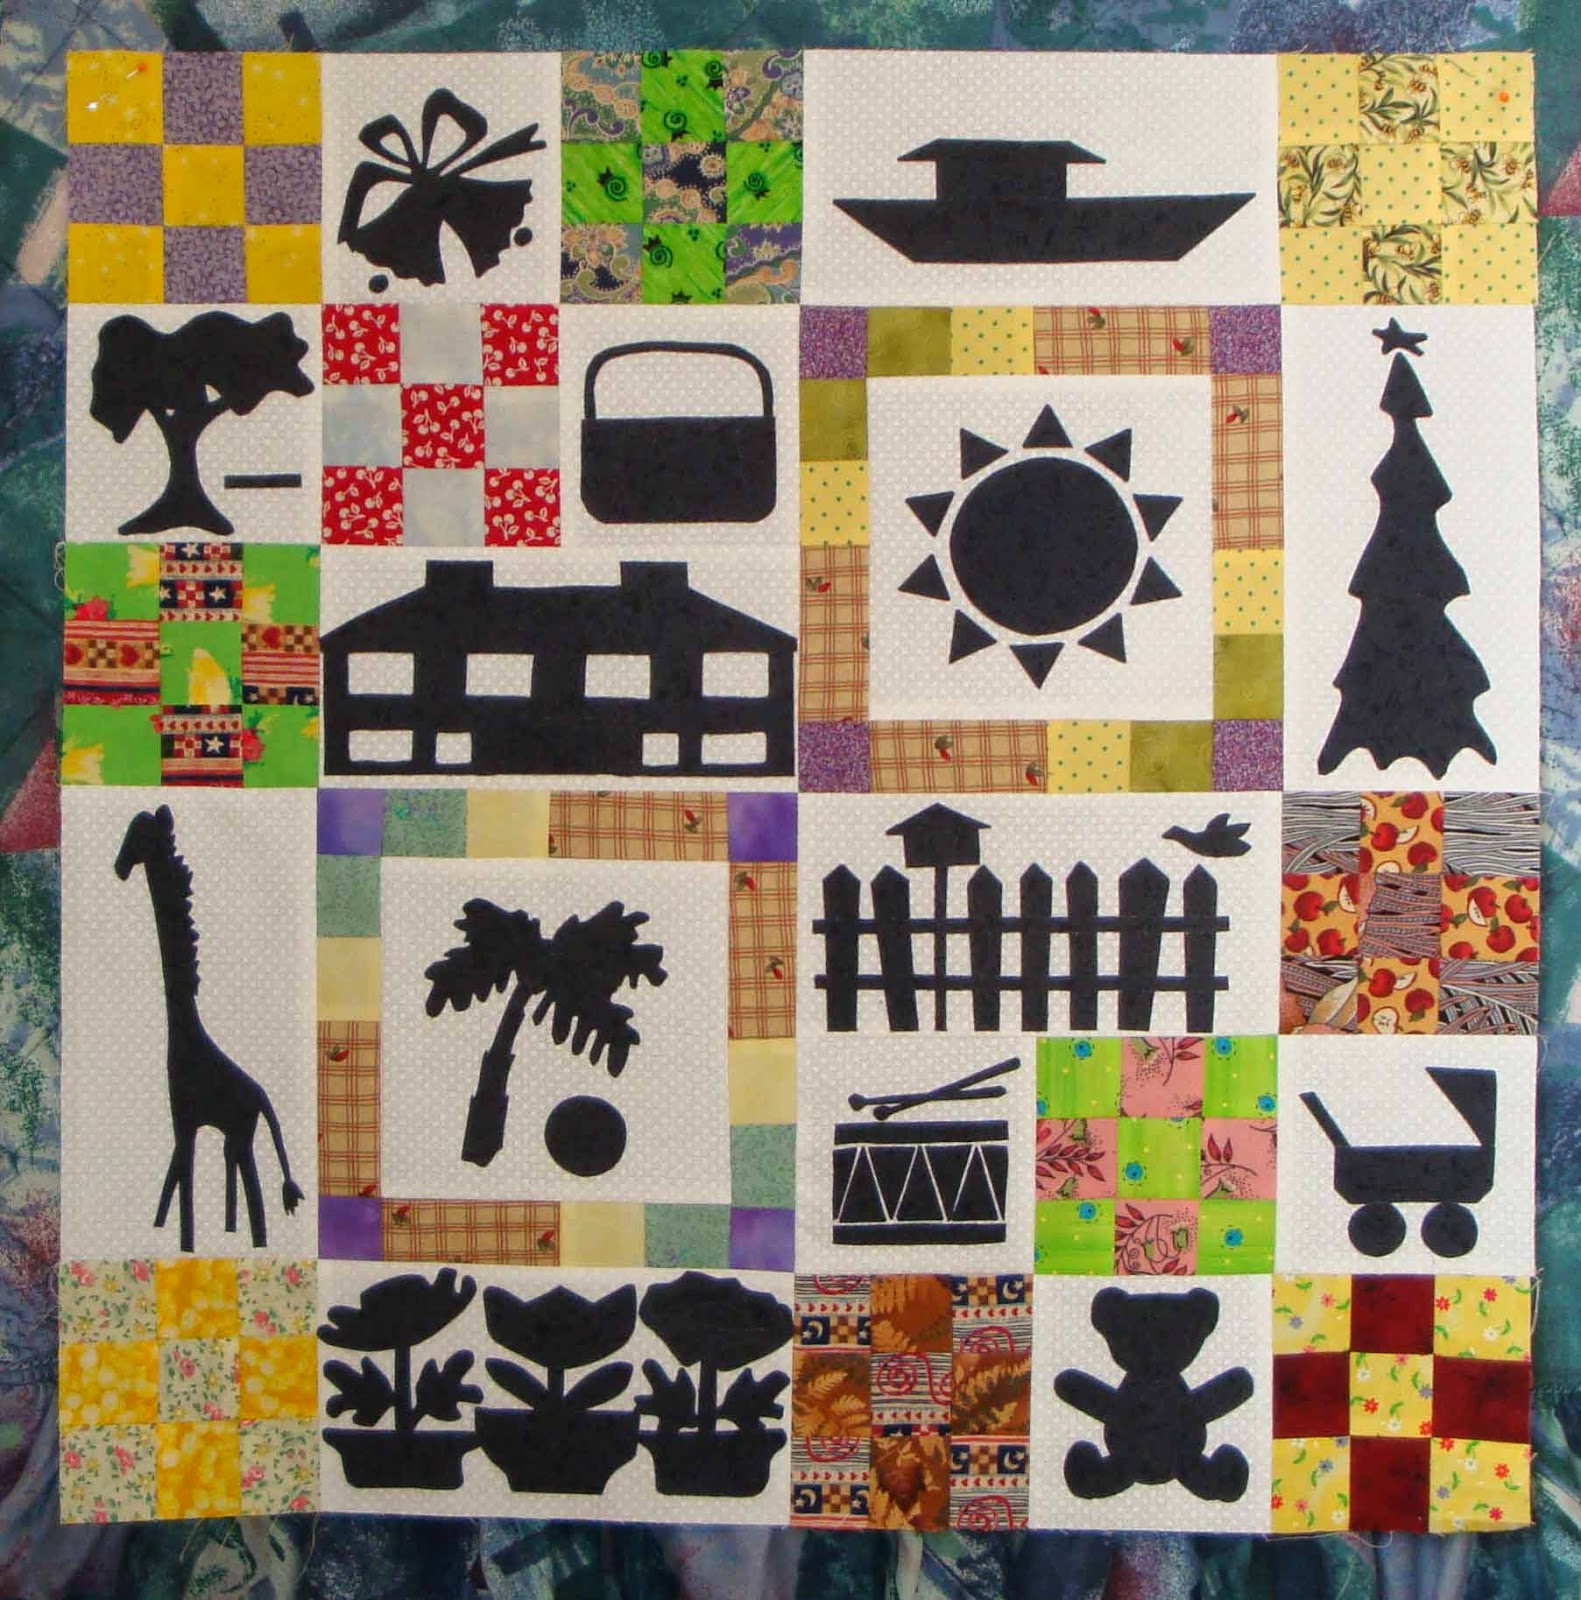
APPLIQUE MYSTERY QUILT ALONG -- NINE-PATCH
(As shown: 25 1/2" x 25 1/2" square)


With everyone having a choice of at least four different pieced blocks and using their own fabric colors for their applique designs; one can see that each quilt would be totally unique. Each quilt can tell its own story; and that was what I entitled this project: "Life's A Journey". 

The approximate finished size of this project; if using only the two borders in the pattern instructions, it should be: 33" x 33" square. Please feel free to try other layouts and color choices for more new and exciting story telling... using colorful fabrics and thread. 

* ** *** * **** * *** ** *

SCRAPPY PIECED BLOCKS

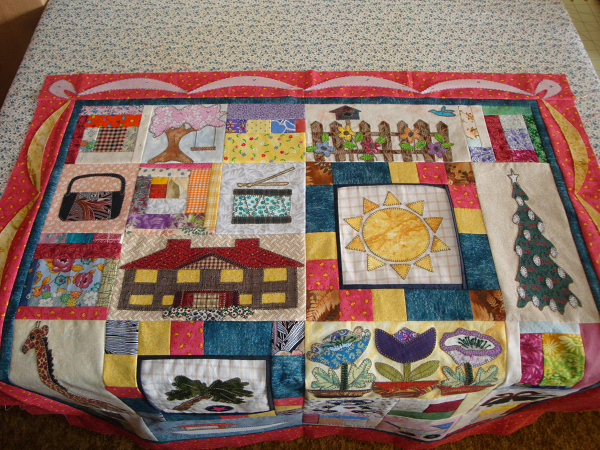
I wanted to have you see that going totally scrappy will still create a stunning quilt. I even used only one thread color for the complete project. If I don't have enough fabric in a specific color grouping, I can easily select new ones, and still come up with a beautiful arrangement with these quilt blocks.

And even when I messed up; I was still able to continue. Or when I changed my mind, it still was possible to make adjustments. That is what is great about quilting, one can make changes or adjustments; if the need arises.
  1. While the pattern needed a three-inch cut for the second border; it was late when I was cutting out my own; and I forgot to add the seam allowance to the finished measurement; so mine ended up narrower than it should have been; because I hadn't written out the final instructions, at that point.
  2. I wanted to brighten up the quilt with bright borders; however, the pink was too much for me; so I added the brown to tone it down. 
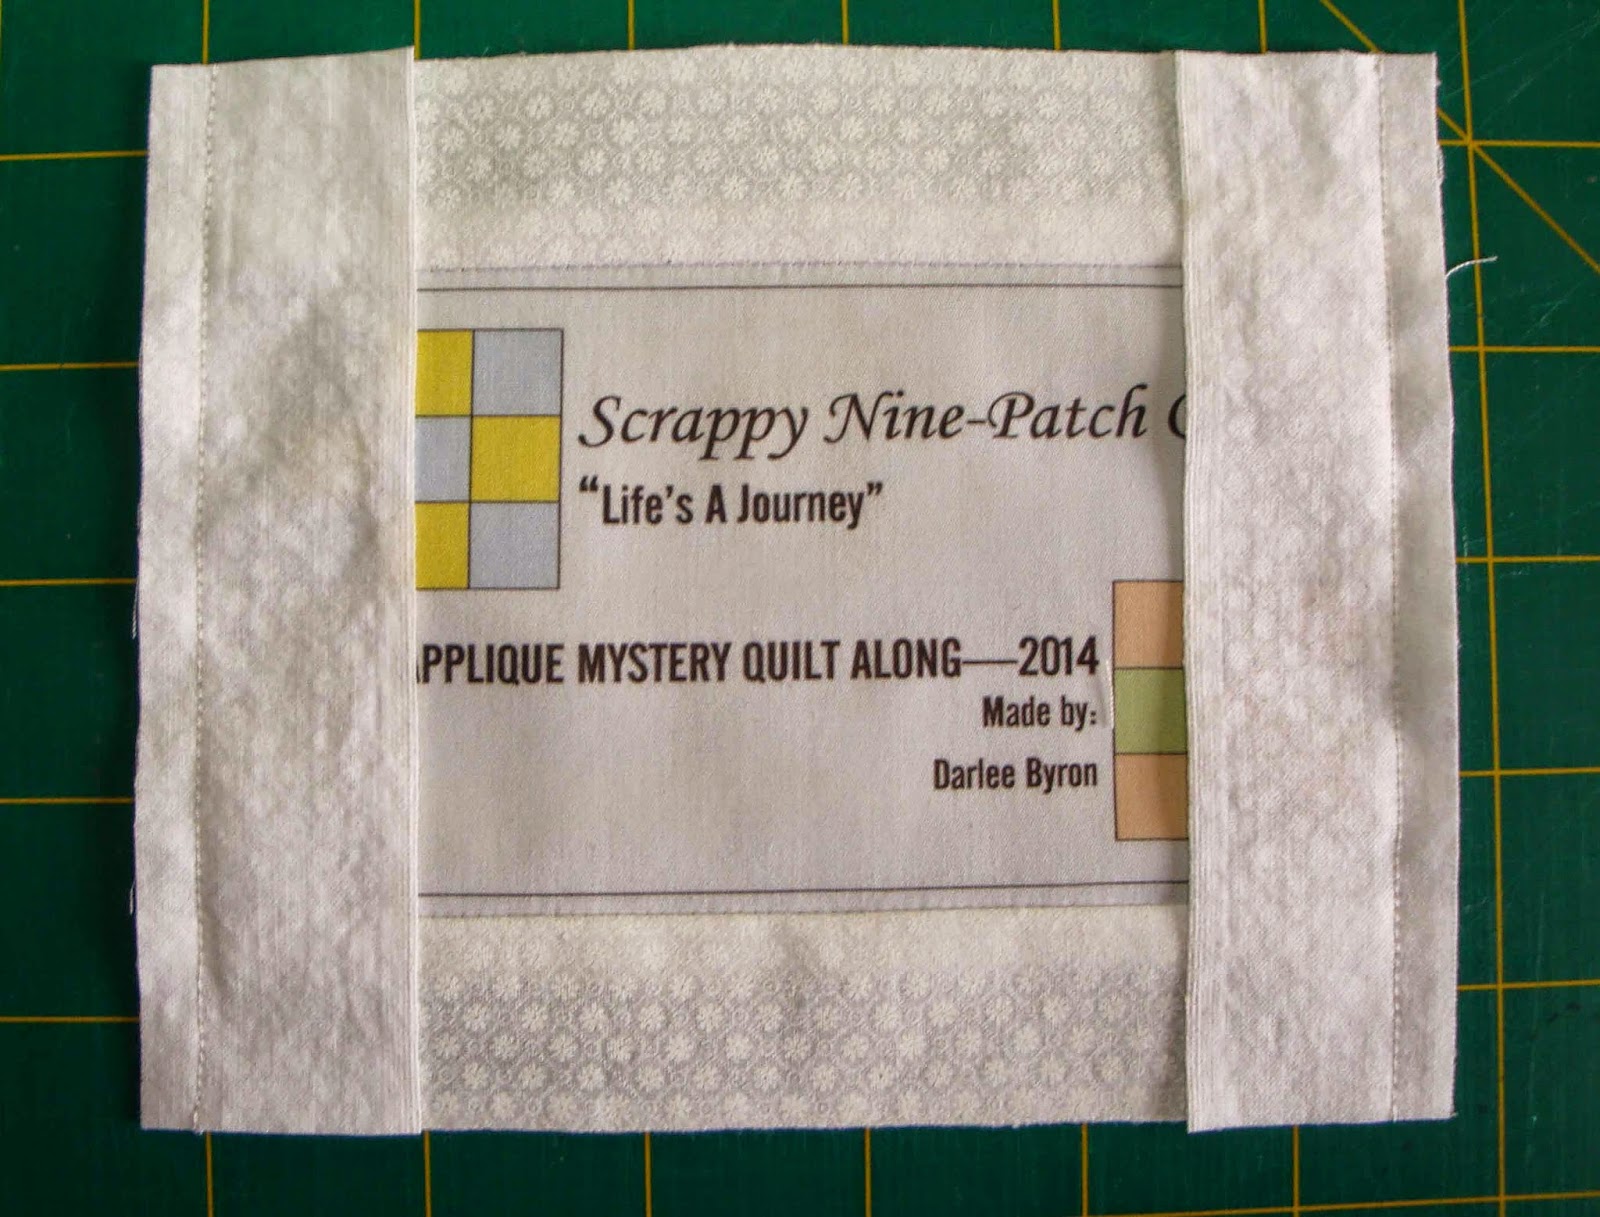
  3. Before finishing up the final hand-stitching of the hanging sleeve and quilt label, I auditioned buttons and added them to several of the applique designs.  


Here’s how my quilt turned out...

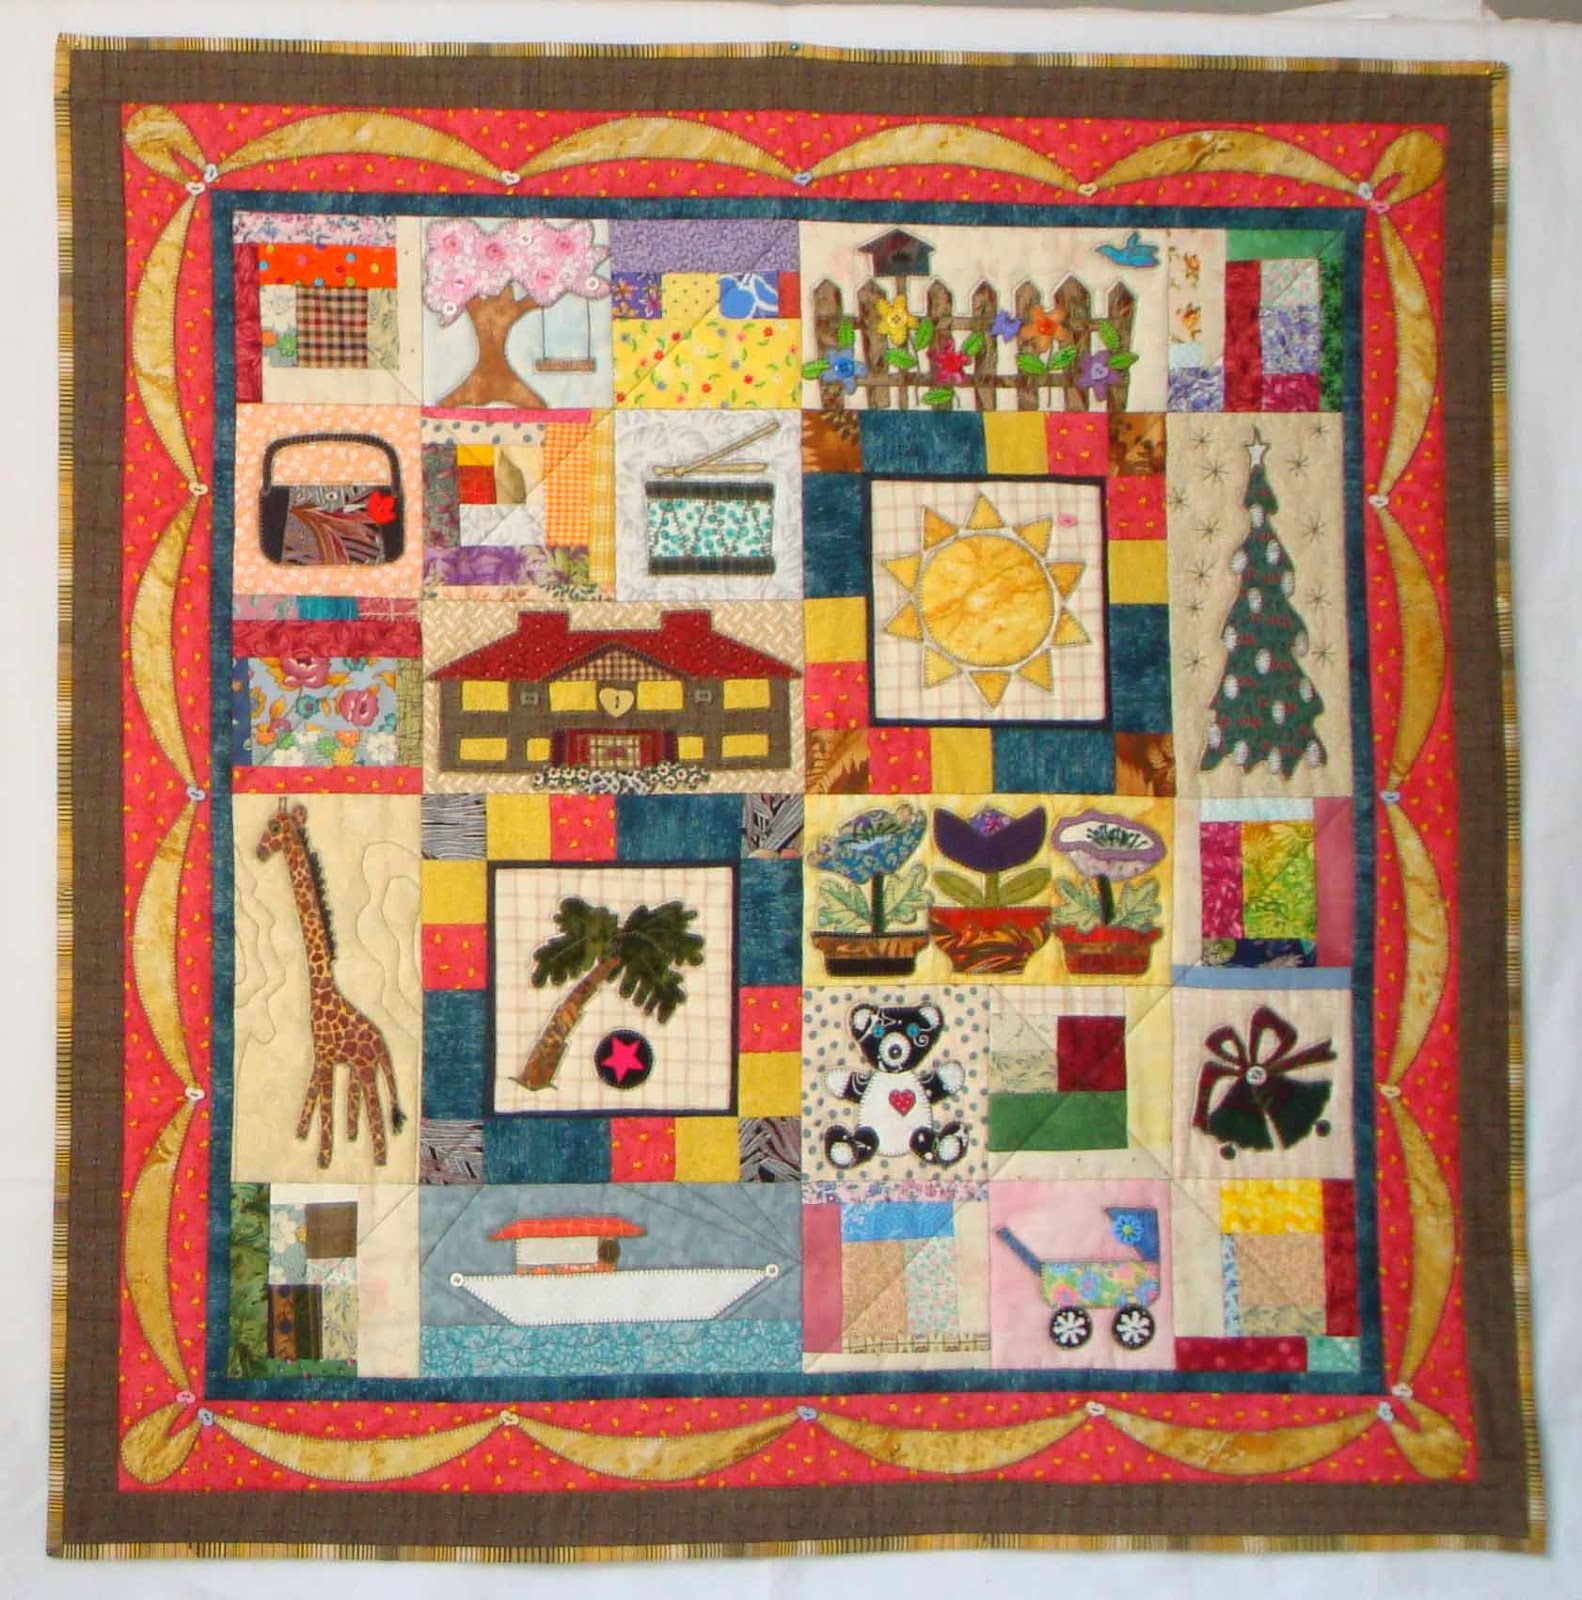
APPLIQUE MYSTERY QUILT ALONG -- SCRAPPY BLOCKS
(Size: 34 3/8" x 34 3/8")
** *** **** * *** ** *

Closeups of some of the appliqued blocks:

Block 7 -- Potted Flowers (embroidered stamens)

Block 5 -- Fence (with Flowers)

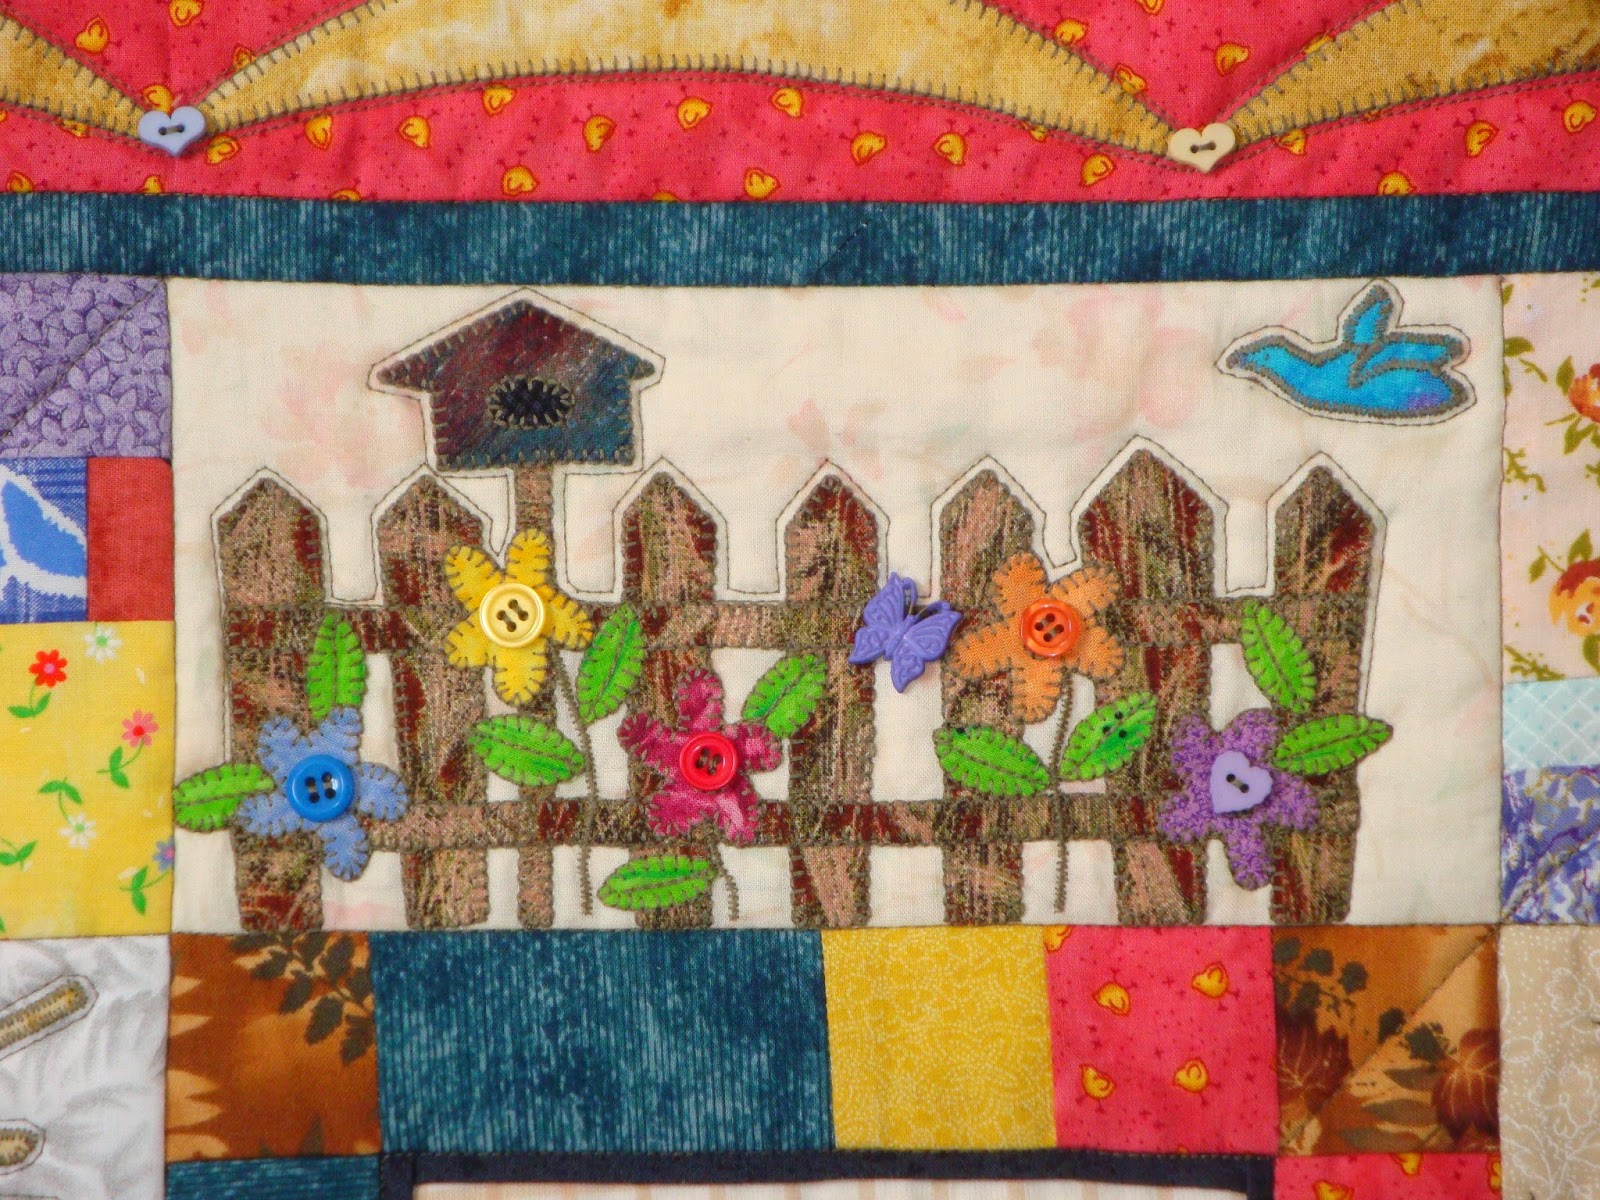
Block 5 -- Fence with Flowers (button centers)

Block 11a -- Boat 


Thank you for joining with me to make this applique mystery quilt along project to brighten up those long winter months. The weekly lessons will be available on my website until May 18, 2014.

Happy Quilting....


Friday, April 11, 2014

My Mystery Quilt Layout

As this Applique Mystery Quilt Along is soon to be completed, here is how my quilt is shaping up; as I prepare each lesson to share with you.


COMPLETING THE QUILT TOP

With the applique blocks and pieced blocks ready and sewn together to make up the quilt top; here is how adding borders will complete the project, and update the look.


BORDER ONE
Using a narrow border, in a darker color; works well to add a framed look to the activity in the blocks; like a frame on a painting. The blue-green fabric was also used on the domino framed blocks.

BORDER ONE


BORDER TWO
The second border provides the surface area needed to apply my chosen swag applique; and give it added interest on this busy quilt.

I chose to use three colors (blue-green, yellow, and pink) on the domino frame and also bring it to the outer borders. My blocks needed to be brightened up and the pink definitely provided that intensity.

BORDER TWO


BORDER TWO--APPLIQUES
I wanted to add interest on this border; and so applied a swag applique to help showcase the handiwork of all the appliques used on the quilt top.

Here, I used a yellow; and instead of the bright yellow used in the domino framed blocks; I decided to use the same yellow as was used on the sun applique.

APPLIQUE DETAIL ON BORDER TWO


BORDER THREE

There are always decisions to make as one builds a quilt. Here were a few good reasons to consider adding an additional border:

1.)  It was only after I has added the swag applique, that I realized I had cut the strips for border two; at two and one-half inches, instead of the three inches wide they should have been. (That's what happens when I want to quilt late at night.) So I had less space between the applique and where the binding would be added. What should I do about this?

2.)  I found I had indeed brightened the look of the quilt; however, now it was just way too pink for my liking. So if I added a darker color, it should bring down the intensity of the pink. (Your computer screen may make this border look more red or orange. But it is very pink!)

3.) I was considering adding piping or lace, on the outer edge, so wanted to have more distance between the swag on this border two and the binding. And I didn't really know how wide this border should be, either; so made it two inches wide, so I could make this decision later.

4.) As a general rule, it is a good tip to have the ability of trimming the final border narrower, if desired; and to ensure it is even and has square corners, when trimming all three layers. Here, I would have possibly cut into my swag applique, if my quilt needed extra squaring up, before adding the binding.

So, here is how my quilt looks with the extra border in brown:

BONUS: BORDER THREE


I decided that I really did need to add an extra border; and this color will provide a better background for my chosen binding fabric.  So, my quilt will be a few inches larger than the original pattern indicates.

The final post on this mystery quilt, will show up in a few weeks, when the last lesson has been posted on the website. Thanks for coming along on this quilt journey with me.

Happy Quilting....


Saturday, April 5, 2014

Creating Unique Quilt Labels Tutorial

Everyone knows a label on a finished quilt is how we know who made it and when. But, do we always find the time to create one and stitch it onto our own projects? Perhaps not....

I like using my computer to design my own quilt labels to fit each project and make them each unique. As one can easily add color, insert images, fancy text, and make it all small enough to fit on a label. Editing is quick and easy; and when one is finally satisfied with the end result, off it goes to the printer.

Illustrations and Photos shown in this tutorial are from the Applique Mystery Quilt Along—2014 project.


APPLIQUE MYSTERY QUILT ALONG LABELS
 
 
QUILT LABEL TUTORIAL INSTRUCTIONS
 
1.      To begin, consider what you’d like to write or draw on your quilt label.

2.      Open a word document and set up a table with several rows and columns. As you plan out your design you can add more; or delete any rows or columns you do not need.

3.      If you select “no borders” these will not show when the label is printed. (These borders are visible in the illustration below, as blue dots.)
 

LABEL IN A WORD DOCUMENT
 

4.      On your page, provide white space around all sides of your label, so you have room to cut around the label to allow for seam allowances.

5.      Play with different layouts, fonts, and images if needed, so you can see what works best for the label information.

6.      Once the design is ready, check it over for errors and do any editing to finalize it before you send it to the printer.

7.      Insert your sheet or cut piece of PhotoFabric into the paper tray and print your label with the best quality ink setting.

8.      Once printed, follow the manufacturer’s instructions to prepare it so it is ready to work with.

9.      I find the type of fabric used in this product will stretch out of shape as it is stitched onto the quilt back. One way to keep the edges straight; and looking good once applied to the quilt back, is with added borders. (I prefer to add at least two borders onto the printed label portion. This allows the label to keep its shape.)  
 

CLOSEUP OF STITCHING ON LEFT SIDE OF A LABEL
 

10.  Embellishing the quilt label, you may add applique pieces that are made specifically for the label or are extras from your project, if desired. [examples below]

11.  A quick way to prepare and also eliminate extra hand-sewing, is to use the selvage edge from fabrics to make the border strips. (If you don’t use selvages, allow an extra width to fold back raw edges on all four sides.)
 

RISK AVOIDANCE: If iron is too hot; it will scorch the label fabric. To be safe, use a pressing cloth when pressing the seams and applique embellishments on your labels.

 
12.  When adding each strip that goes around the label portion, place the raw edges together with right sides together; and stitch on the top and bottom strips, using at least a quarter-inch seam allowance. Press open.
 

ADDING FABRIC STRIPS TO LABEL: TOP AND BOTTOM
 
13.  Trim sides to where you want your seam allowance. Then add the side strips.

 
TRIMMING OFF EXTRA ON SIDES OF LABEL
 

ADD STRIPS TO SIDES OF LABEL


PRESS SEAMS -- FRONT SIDE VIEW


VIEW OF BACK SIDE OF LABEL


14.  If only adding the top and bottom strips; to hide the raw edges, you will fold back both sides. (Having the top and bottom strips will give it enough rigidity to keep the label straight as you hand-stitch is onto the quilt.)

15.  If you do not want any raw edges, cut the two side strips about one-half inches wider; and after stitching onto the label section; fold these two raw edges under.

16.  The label has added color and will not stretch out of shape; and is ready to hand-stitch to the back of the quilt.

17.  One last step: is to stitch the label to the back of your quilt. J


EXAMPLES OF OTHER LABEL RESULTS
 
 
FINISH TWO EDGES WITH PURCHASED BINDING
 

SHOWN: BACK OF LABEL USING BINDING


USING APPLIQUES TO EMBELLISH THE LABEL


SELVAGES USED ONLY ON SIDE STRIPS; TOP AND BOTTOM ARE FOLDED BACK


TWO SELVAGED-EDGE STRIPS USED; TOP AND BOTTOM ARE FOLDED BACK.
(THIS LABEL WAS DAMAGED WITH THE IRON, SO I MADE ANOTHER ONE.)

 
LABEL USES TWO SELVAGE-EDGED STRIPS - TOP AND BOTTOM.
RAW EDGES ON BOTH SIDES ARE FOLDED BACK.


FINISHED LABEL - TEXT AND IMAGE CREATED IN WORD


Participants in the Applique Mystery Quilt Along may use the quilt label provided along with the weekly lessons on the website. If you can open it with MS Word on your computer, you should be able to type in your name; and change any colors, if desired.
Hope these examples have inspired you to try creating your own unique labels for all your quilting projects.
 
Happy Quilting....