Sunday, April 25, 2010

Paper Templates

TEMPLATE QUESTIONS:

Why use a template? 
Templates are a necessary step for creating those odd shapes required for some quilting techniques.

What materials have been available for me?
Looking back in time, people used whatever materials that were available to them. I have enjoyed using all the new innovations that are available now, as I began my quilting journey only about 8-9 years ago. There are more tools and techniques available today that make our quilting journey much easier and fun!

When did I need templates for a quilting project?
The time I needed special templates was for a quilting workshop that I took in 2008. The process seemed much more difficult then I thought was necessary. That project is still waiting for completion.

How do I make my templates now?
As I understand progress, doing things in a new way for simplicity and greater success is why I make my templates out of paper, not plastic. Yes, that's right!!

As I see it, however fun a workshop is to learn a new technique, the desired goal is to complete a quilt. Now, I know that even though that seems simple, it may not always turn out that way, every time. 


HERE'S HOW I MAKE TEMPLATES:
These templates were for a project that needed several baby blocks in three different colors. By using paper templates, I can get to the sewing process more quickly.


Step 1.
The materials I will need are: fabrics, paper pattern, scissors, scotch tape, and my rotary cutting tools.

Step 1:  Rotary Tools


Step 2.
The pattern is either printed out or drawn onto white paper and then cut out. Then is attached to the fabric with small pieces of scotch tape, just enough to hold them in place.

Step 2:  Attaching the Template


Step 3.

From that, I just need to cut them out. I usually line up the sewing line with a 1/4" allowance added. This way if I don't have a seam allowance added on the pattern, it adds it for me when I cut.

These photos show the seam allowance added. Generally, I do not add seam allowances to a pattern, because I can easily add it when cutting my fabric pieces in this step. As when I do fusible applique, I do not need seam allowances, so then I would place the edge of the ruler without a seam allowance added.  

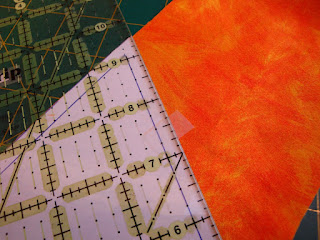
Step 3:  Cutting out the Template


The Paper Template:
  • Easily converts the pattern design to template pieces.
  • Time is saved because either it is printed or drawn out only once onto paper.
  • Lasts for many uses with the use of rotary cutting tools.
  • The cutting method automatically adds the seam allowances.
  • Once the paper design is printed and cut out, it is ready to lay onto the fabric.
  • No need to add seam allowances to the template before cutting the fabric.
  • No special markers or template materials are required.
Bonus: No extra time is needed to draw the shapes onto the plastic sheet, cut them out, then trace around the template to draw the shape onto the fabric and then finally ready to cut the fabric.


EIGHTH PROJECT - MAY 2010:


My eighth project will be shared next week...


The Bargello Quilt Book/
by Piecemakers


Enjoy your quilting adventure for... 2010!!

Sunday, April 18, 2010

Classic Quilts

Book:
Thimbleberries
New Collection of Classic Quilts/ by Lynette Jensen

Time to reveal my next project... I choose: "High Country Pinwheels - Christmas" on page 64. (There are two designs:  one is done in blue fabrics and the other in Christmas fabrics.)

Fabrics, Book

So, for a different type of quilt then I normally make, I chose this one – no applique, no embellishments, just the color choices and how the fabric pieces are placed to create the complete design.


OBSERVATIONS:

I do find this type of quilt very easy to assemble and it seems piecing is a popular technique of many quilters. As all you need is the ability to cut up fabric and sew straight lines. However, the results are inspiring, as the finished design ALWAYS looks more complicated then it really is to make.

Also apparent to me, many people love to make bed quilts, so this book is a great place to explore for these classic and popular designs. 

If you would like to see the quilt project titles and sizes for this book, you may find them on my website listed under "T". All the books that have been reviewed on this blog, have this information on my website.


MY PROCESS:

Still having a good supply of Christmas fabrics, it was time to use up some more of them in this project. And, I bought this book several years ago through a book club and it was time to give it a try… 

Since most of these classic projects are for larger size quilts then I can quilt on my own machine, I have scaled it down considerably. It is my goal to create small quilts while I try out new techniques and enjoy the process of expanding my skill level.


Cutting the Fabrics

Sewing the Small Pieces Together

Binding - 1/2" wide


Finished Quilt
 Size: 32 1/4” x 32 1/4”


Next week...
My next book choice and then a reveal the following week. If you wish to see what books are being featured you can also check out my website for more details.

Happy stitching!!

Sunday, April 11, 2010

Iron TLC

It used to be that I wondered how anyone could get their iron base so dirty when working with fusible products! But... as I believe, when one wonders too much about such things - they have a way of showing up in one's life. I found out how easy it is to get fusible on the base of my iron.

It didn't really happen until I started this Quilt Challenge of mine in January. As you probably already know my favorite technique is working with fused applique designs. And up until now, I had traced out the designs onto the paper-backed fusible web. These shapes are pressed onto the fabric and then cut out, leaving no chance to get the fusible web on the iron. (I use lite Steam a Stem 2 fusible web.)

Fusible Web

However, when I worked on the Simple Stained Glass Quilt there was a large piece of fusible web used and the fusible side of the grid interfacing I used on the Watercolor Landscape Quilt was on the reverse side of the design. So, in both cases, I had fusible on either the opposite side or larger then the fabric pieces. Here I started to see how easy it was to get the iron on these fusible surfaces.

To this end, my iron was covered so badly that it was impossible to glide it across the fabric. This resulted in the necessity to find out how to get it clean!! 

Iron base

Here is some great advice...

I looked up Laura's site "Artfabrik" for fusing tips and recommend you check it out for yourself. I love her designs and know she has the answers to making fusible web easy to play with. 

Iron-off for cleaning your iron

I haven't tried some of the other fusible web products, she recommends, so I encourage you to give them a try and decide for yourself. I did buy a teflon pressing sheet and would recommend getting the biggest size you can afford. This really makes working with fusible web products fun and easy.

And... if you do need to clean your iron, here is a great place to start!! Now, I know that using the best products for each quilting project, will result in a perfect experience!!


SEVENTH PROJECT - APRIL 2010:


My seventh project will be shared next week...

Thimbleberries:
New Collection of Classic Quilts/
Lynette Jensen

ISBN: 978-0-9770166-7-9


Enjoy your quilting adventure for... 2010!! And, looking ahead, I plan on trying a quilt project from Laura's book, "Fuse-and-Tell Journal Quilts" sometime in the fall. 

Sunday, April 4, 2010

Autumn Quilts

Book:
Easy Does It For Autumn/ Art To Heart by Nancy Halvorsen

Time to reveal my next project... I choose: "Halloween Candy Quilt" on page 5.

I know that for me.. Halloween isn’t until October 31st, but I have not done a quilt project from this book yet, and wanted to make a smaller fun project with these delightful autumn colors.

Fabrics, Book

For those of you enjoying the autumn season now, this book would fit in real well. Although, I don’t know when you celebrate Halloween, there are other great autumn projects to make. I look forward to revisiting this book, to make several more of these autumn projects.

I remember thinking last month, that April would be a time to do some fun seasonal quilts and so I’ve done just that! For me… if the quilt is small and it has an applique design on it, then I am very motivated to make it!!

To begin, I need fabric...
I find it rewarding to have my fabrics neat and tidy in this cabinet. I can easily pull out the fabrics and choose those that will be suitable candidates for my next project. Then, it is just as easy to put them back when I am done with them.

Fabric Cabinet

The assembly...
This project has two background pieces and one border that are all sewn together before the appliques are added. It makes it possible to have the design extend onto the border edges.

Quilt Top

The pattern uses the method of adding tabs to the top for hanging and no binding as the layers are put together and then turned. This was a method I would have chosen in the past because hand-stitching was not something I wanted to do.

However.. this time, I decided to add a binding and a hanging sleeve, instead. This is one technique that I have come to enjoy and adding the binding and hand-stitching it to the back is my preferred method, now.

Quilt Layers, Binding

For all bed quilts, I still would machine sew the binding to the reverse side and bring it to the front and then machine stitch it in place. This causes less stress on me and allows time for other things.

Embroidered phrase on the Moon

 Stitching around applique pieces

Finishing...
This is always a rewarding part. The binding is so easy to attach and creates such a lovely edge. And, the final steps are to attach a label to the back and take photos of the completed quilt.

Finished Quilt Showing the Binding


Finished Quilt
(Size: 9 3/4" x 24 3/4")

Need motivation:
After getting all the tax returns I needed to file, done early, I thought.. why not do a quilt theme out of season! If doing taxes is something you keep putting off, then why not challenge yourself to get them done and reward yourself with a fun quilt project.

Next week...
My next book choice and then a reveal the following week. If you wish to see what books are being featured you can also check out my website for more details.

Happy stitching!!