Friday, January 24, 2014

That Scrappy Block!

To have a group of quilters start out with the same quilt pattern, and then allow creativity to take it the rest of the way, is my idea of a great journey in quilt making. The added twist to heighten this adventure was to provide only black and white images; that would magically be transformed into beautiful renditions of the story being told. I look forward to seeing your finished quilts!!

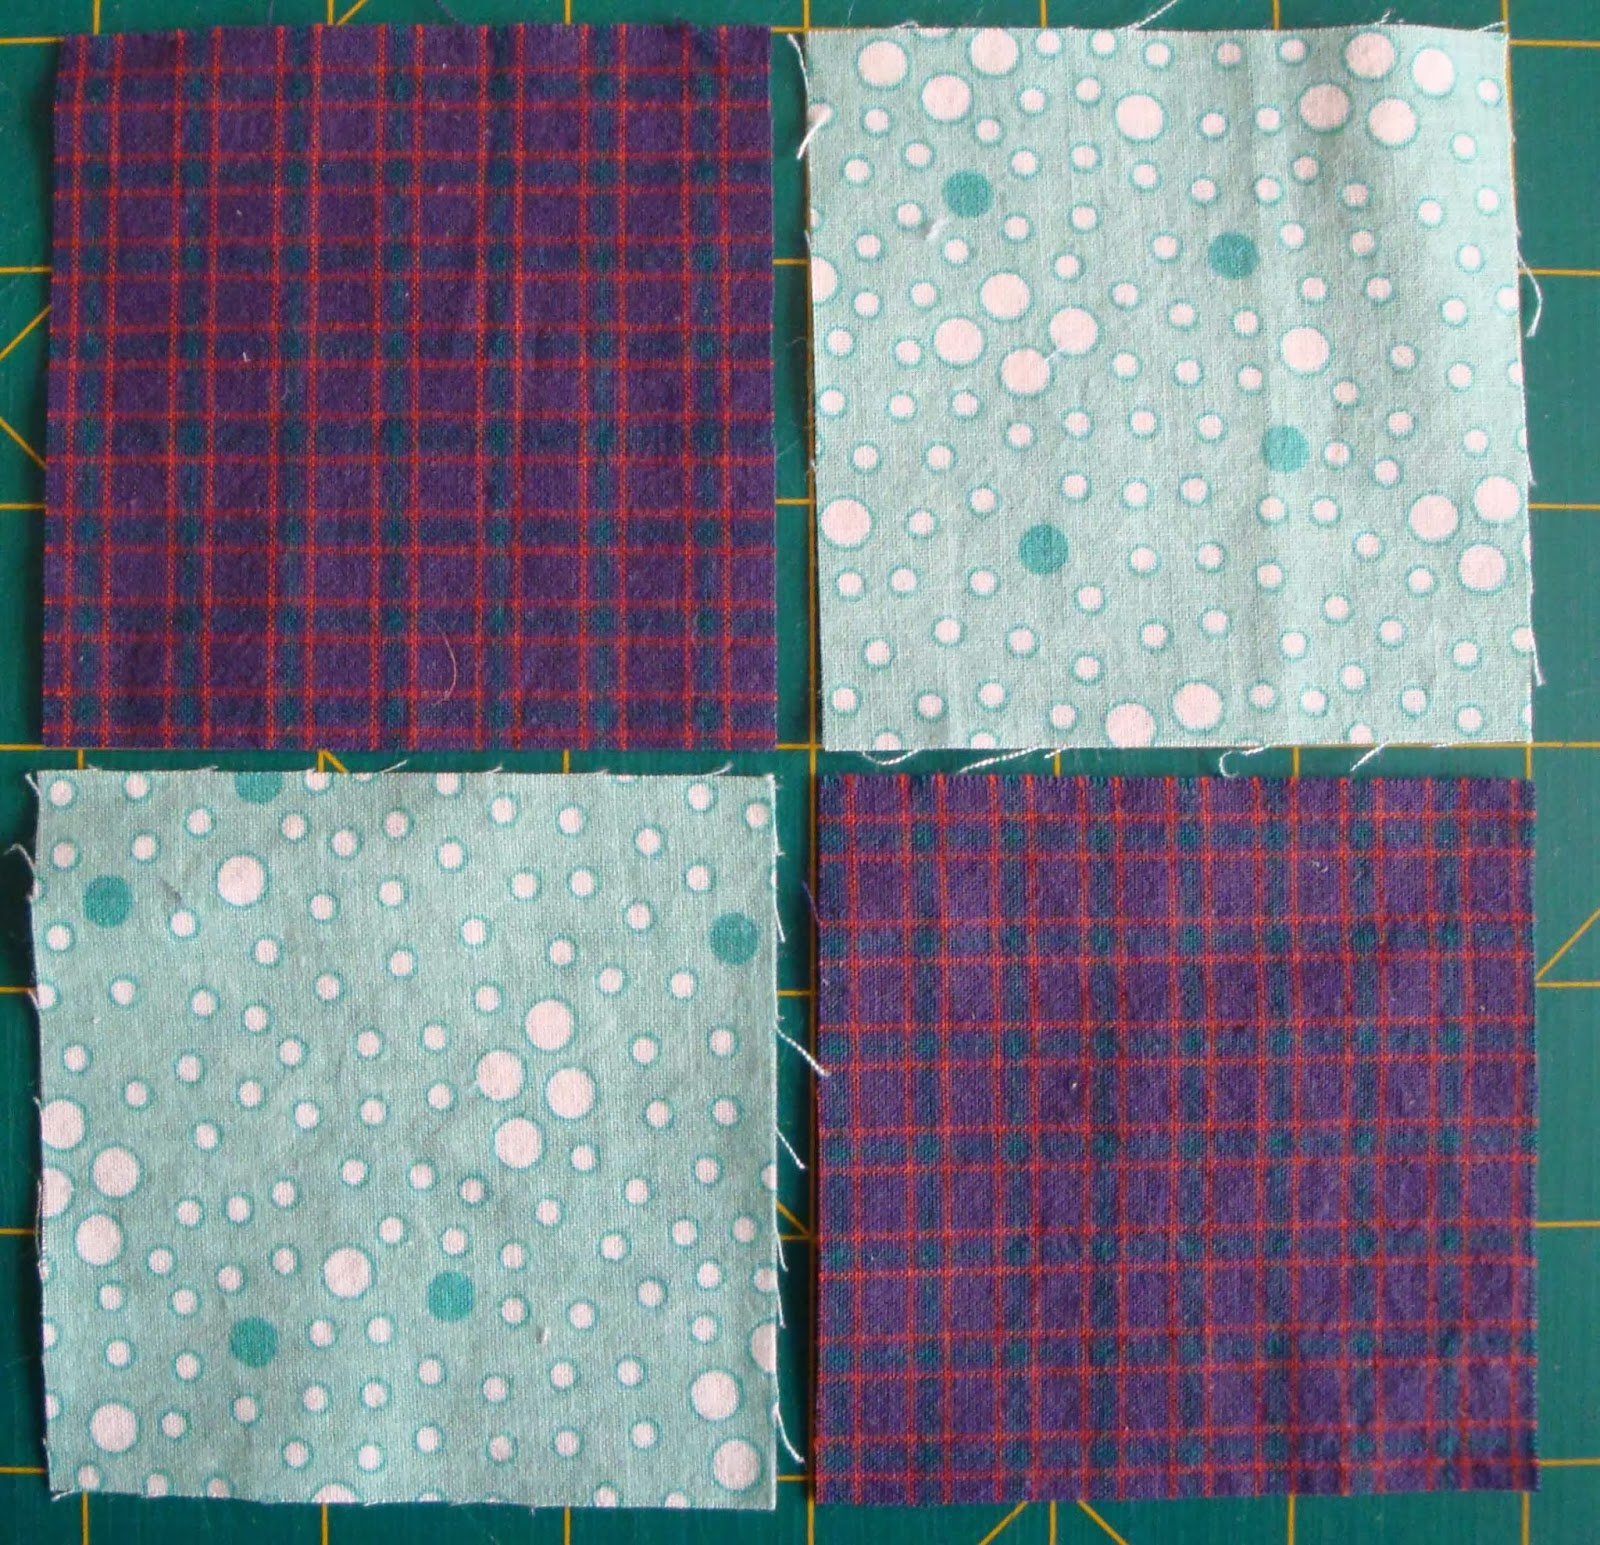
Another option... was to add variations, so these quilts could be even more unique to the story being stitched into fabric; and allow quilters of all skill levels to create a beautiful quilt.  So we could choose to do a nine-patch or a four-patch or a plain five-inch block or a scrappy block. Or maybe even try something else, not suggested here.

In previous posts, I've shared the nine patch and the four patch. The plain block really doesn't need much explanation; except to say that there are many gorgeous fabrics that could be featured in this quilt; a few examples: beautiful floral designs; kid prints, or vivid hand-dyed fabrics. Any theme would compliment the appliqued blocks.


GOING SCRAPPY
Scrappy is a great technique to use when you have a heap of beautiful scraps waiting to be featured in your next quilting project. They may not look like much tossed and crumpled in that drawer or basket; however, they do create some interesting blocks, when used. With the huge variety of patterns, books, and designs available; there really is no excuse for us, not to use these great leftover fabrics.

For this quilt along, I've decided to use these scrappy blocks in my own quilt; and use the nine-patch block to create a smaller version of this pattern. (Hopefully, this layout will be featured in next week's post.)

So to make this scrappy block, here are some tips:

1) Use a variety of shapes, sizes, patterns, and colors to make the blocks interesting.
2) When stitching together these odd shapes; it works best if you press before adding the next piece.
3) Do not worry about placing colors next to each other, that we generally think don't work together.
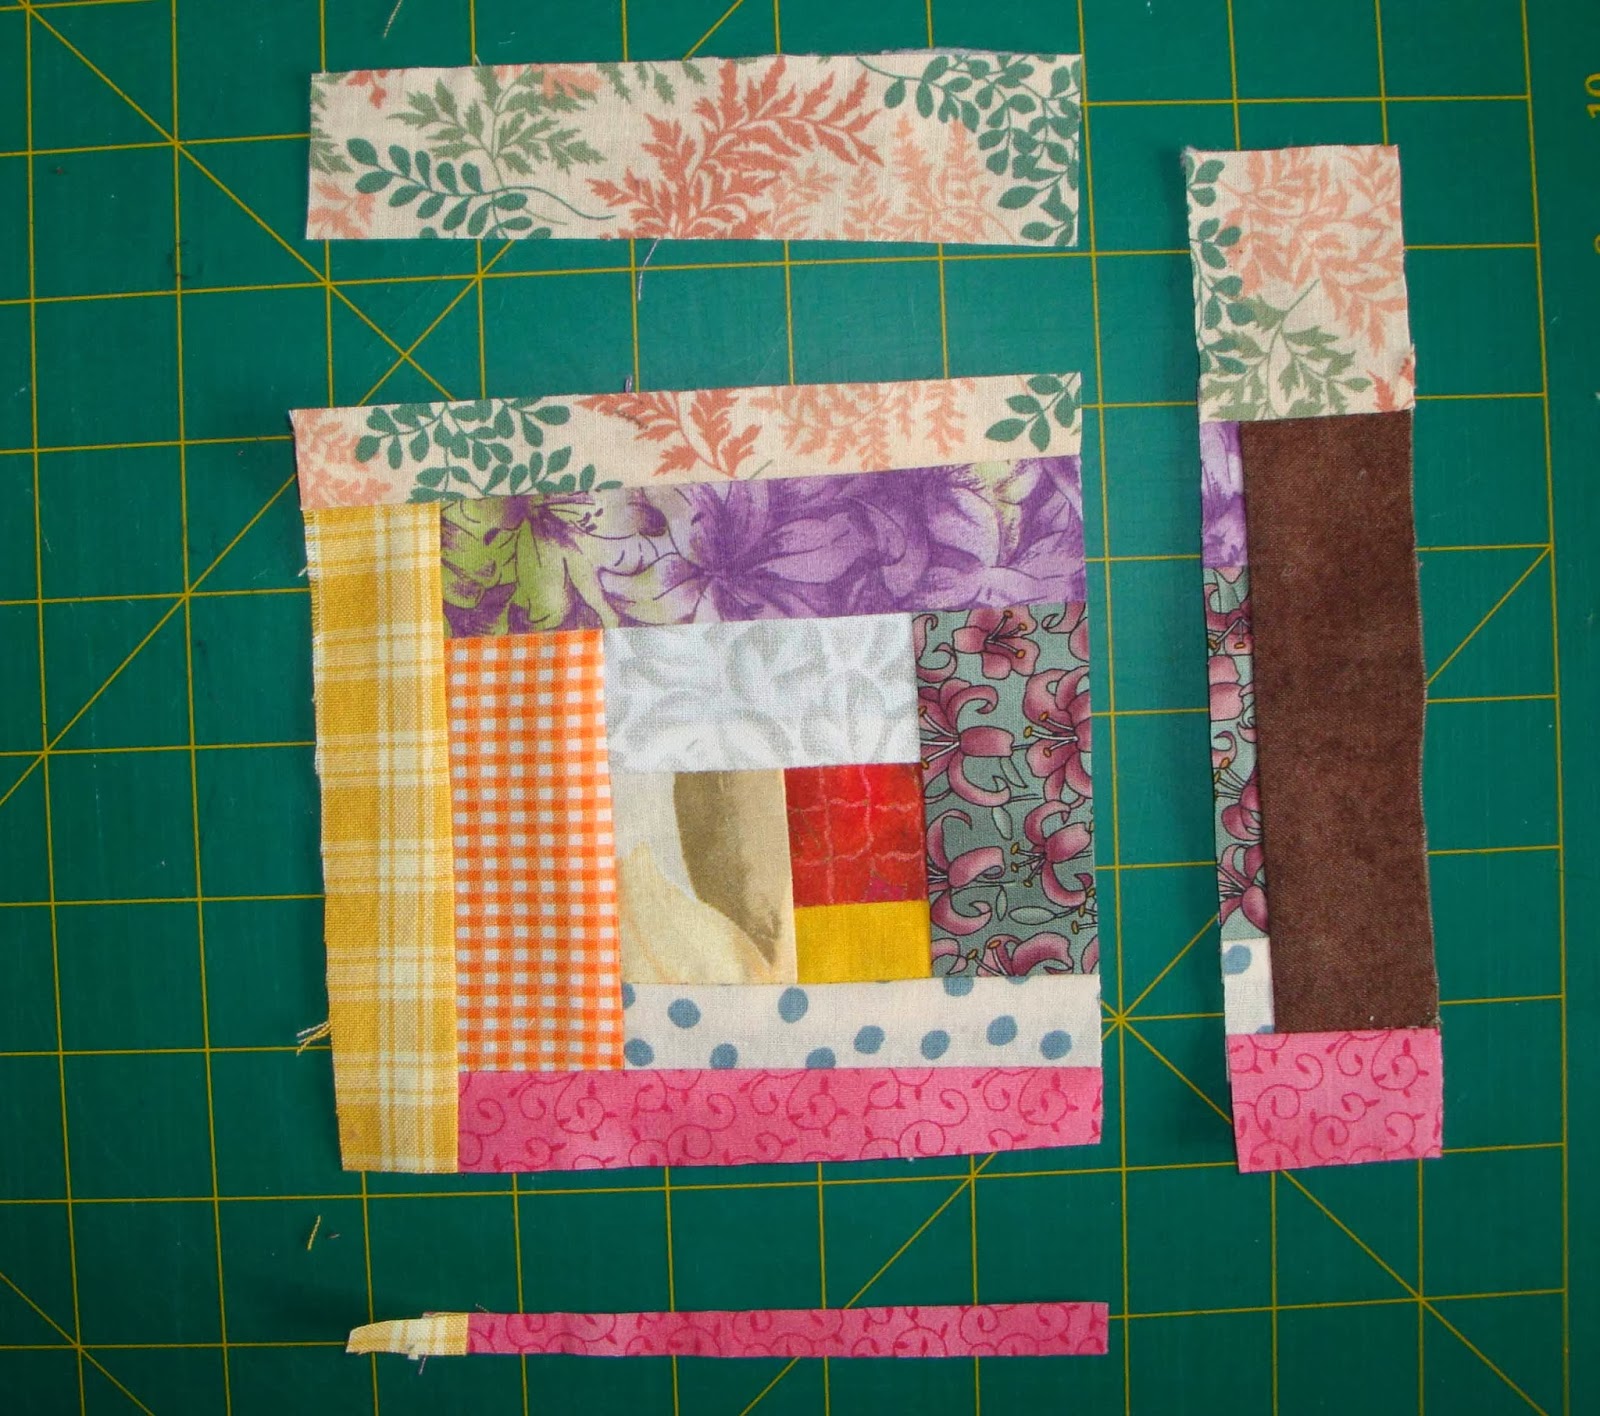
4) Trim extra length off the last piece added, before adding the next piece.
5) Continue adding pieces until you are nearly at the size required.
6) It is generally best if wider pieces are added on that final round around the block.
7) Once large enough, use your rotary ruler to trim it to the size required.
8) Seam allowances do not need to be a perfect quarter inch.
9) None of your ten blocks need to look the same. Select a variety of fabrics to create a unique set of blocks.


Taking the four variations that I provided in the quilt along lessons, the plain block needs no instruction as it is a five inch square of fabric. However, you could select a specific theme to help tell this quilt's story.

Let's check out the fourth option: the scrappy block -- that I'd like to show you, in case you find this one more difficult to construct. Here we can go as wonky or perfectly spaced, as desired. If you'd rather make a more perfectly balanced scrappy block, you could opt for the standard log cabin block, or go wonky and stitch random widths as you go around the block.

This scrappy block can be started with a square or strip of fabric. You can continue around the block, in log cabin fashion; or add pieces to random sides, place them at random angles, or use pieces that already have more than one piece joined together. Just remember to trim your pieces, to avoid adding bulk, as you work around the block.


GETTING STARTED
  1. First, begin with a pile of scraps: in squares, rectangles, strips, or previously joined pieces....
  2. Start with two pieces of fabric, placing them with right sides together; and stitch them together. Here you do not have to make the perfect quarter-inch seam.
  3. Once stitched, press so both fabrics are open. It is best to press each time a new piece is added, to make sure the block lays flat. 
  4. Take another scrap piece and add to the first two.
  5. Continue in this matter, going around and around, until you have a piece that is the size your require.
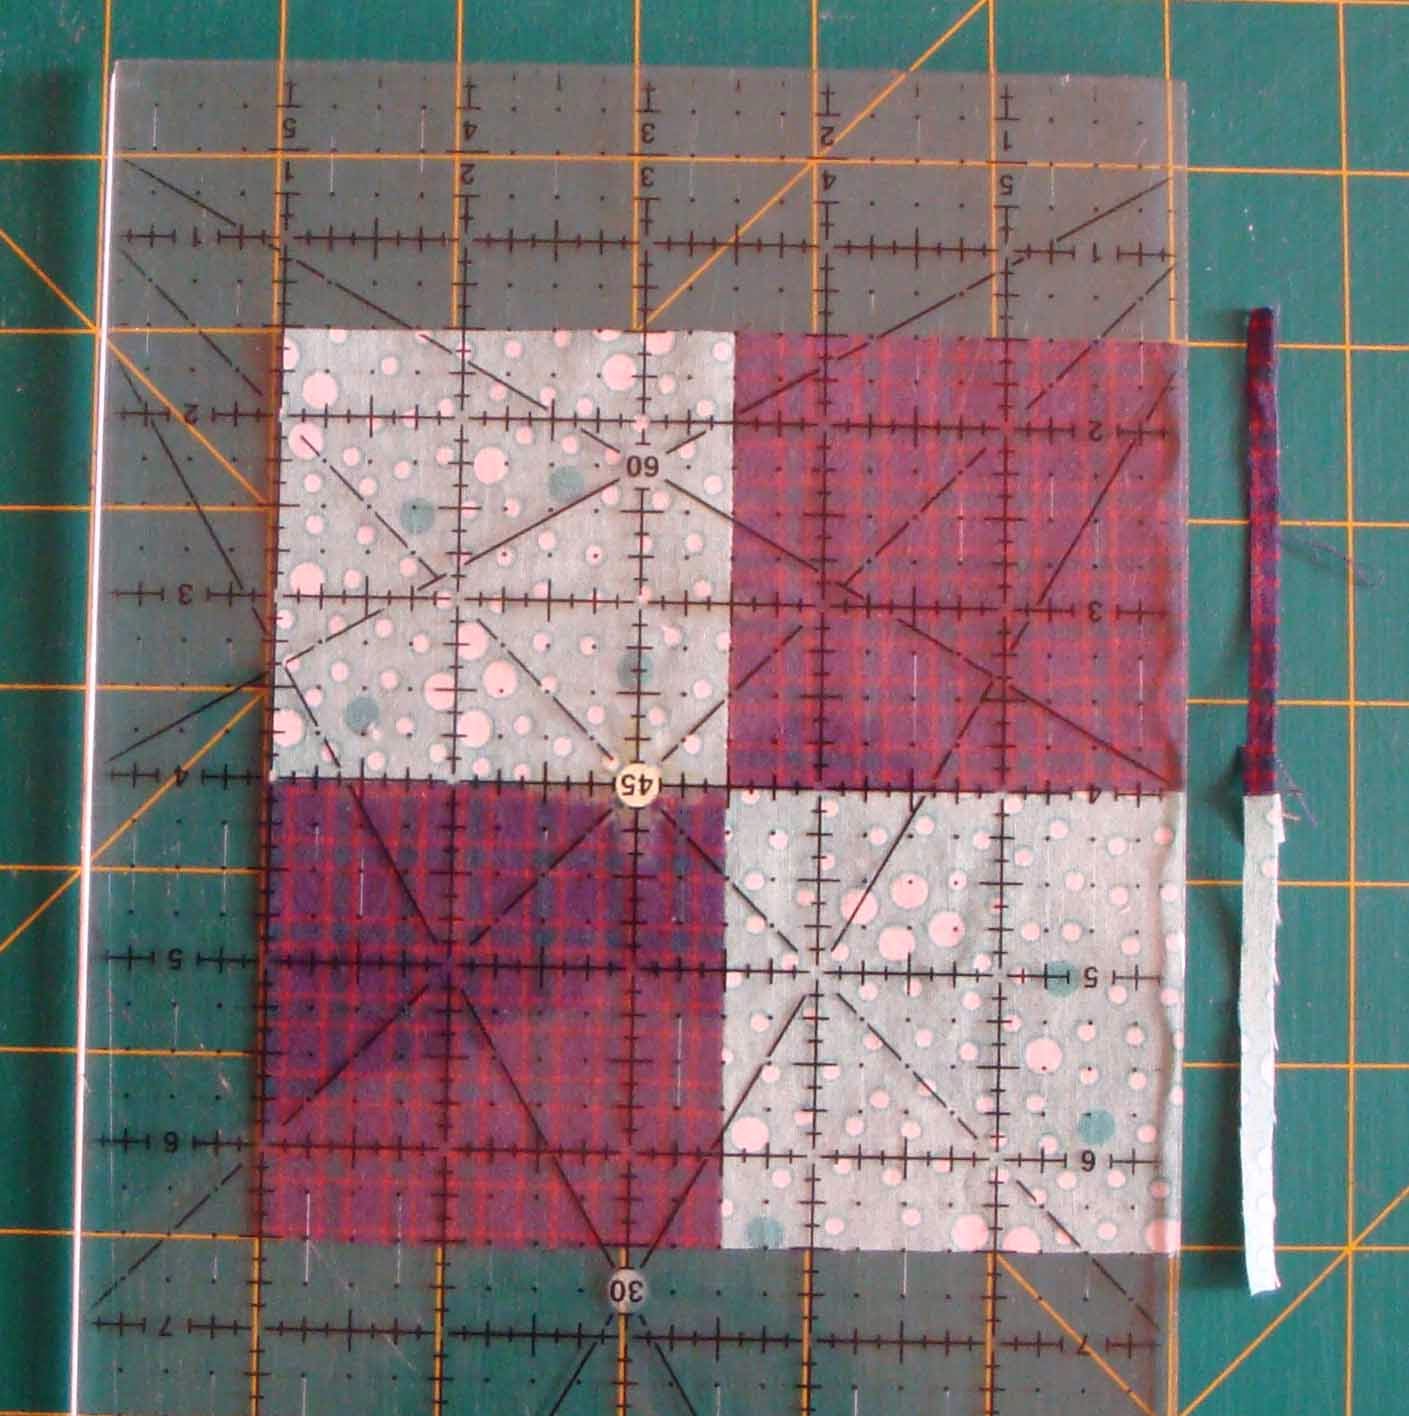
  6. Place your rotary ruler on top and measure to make sure your piece is large enough. 
  7. Then trim any edges off that are not needed. You can place your ruler on the block, in any direction; only be careful to cut it to the five inch piece, that is required.
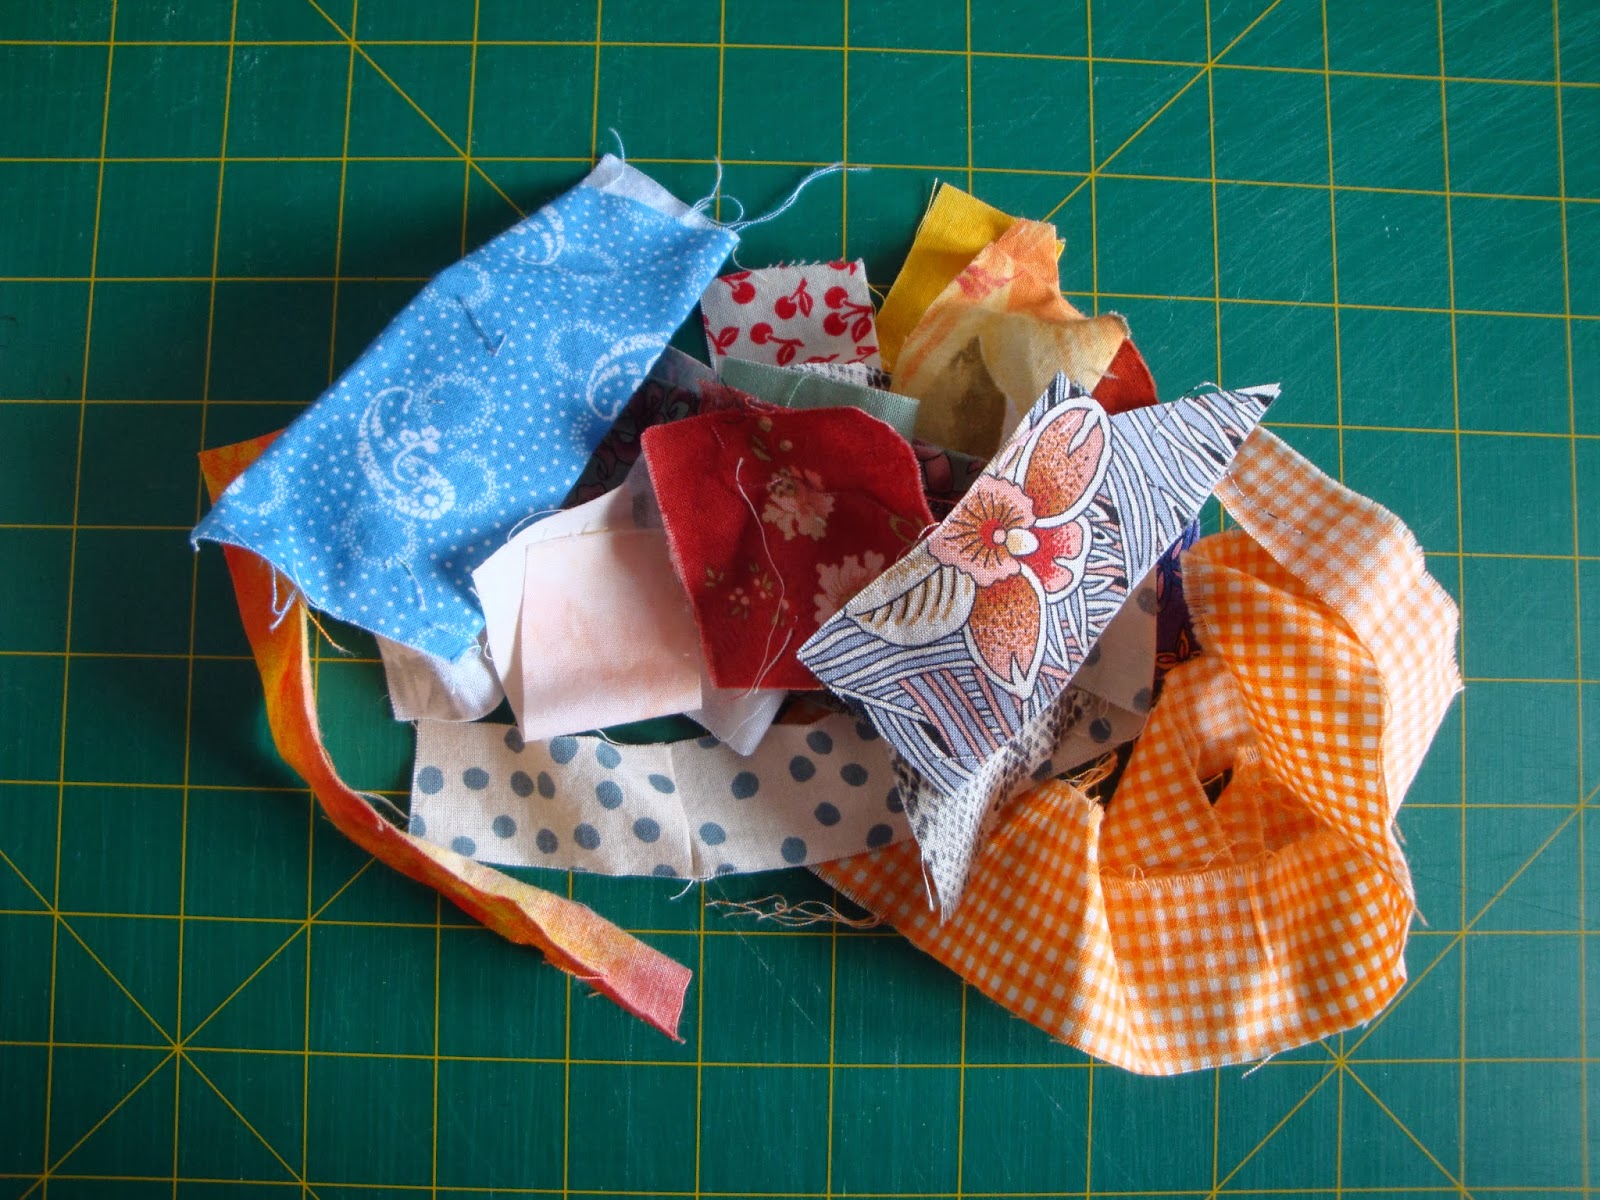

PILE OF SCRAPS

STITCHING AROUND THE BLOCK

TRIMMING THE FINISHED BLOCK 

I had sewn my block to the point where it could have been a six-inch block. This required careful placement of the ruler, to get enough of the outer strips to be more than a sliver in width.


HERE ARE FOUR OF MY TEN SCRAPPY BLOCKS:


My Motto: If you are not enjoying the process, then change it!! 
Do what you can, how you can, and when you can. Quilting has that versatility, built in! 

As you continue each week adding your own style to each block, select those techniques that best suit your skill level; or challenge yourself and try something new. 

Thank you for your comments, sharing your quilt blocks on Facebook, letting me know what you think, or sending me questions when you need help. Enjoy the process!!

*************************************************

If you don't receive my email that contains the link to the next lesson; you'll be able to find it on the website. For those of you on the group mailing list; an email will be going out on January 25, to let you know when the next lesson is available. (Anyone that has joined between January 18-24 will be added to the list.) 

Then, the final addition to the group list will be done on February 1. An upgrade will be available to allow those that want to stay in the quilt along; but can't seem to get the email or have other difficulties will get direct access to the weekly lessons. This is open to all participants that join between December 24, 2013 and January 31, 2014, but is still optional. (There will be a small fee; but it includes a bonus offer!)
  

Please note: If you post a question and don't give me a way to send you a response, I will not be able to assist you. If you don't have my email, visit the about me page on my website. 


....


Friday, January 17, 2014

Easy Precision with Four-Patch

I don't know about you; but I usually don't fuss over how wide my seam allowances are when putting together quilt blocks. It is my quarter-inch foot that decides....

Since, this is a project we each will assemble ourselves, we can use our own method of block assembly for these pieced blocks. If anyone has difficulty getting that perfectly sized block; there are ways to adjust it, so it can be cut to the exact measurements required in the pattern.


PIECED AND APPLIQUE BLOCKS
Our Five-Inch Blocks: (block size before sewing quilt top together - unfinished)
We require ten pieced blocks and six applique blocks, this size. Therefore, let's take a look at what options are available:

To make it even easier for all skill levels, to participate; I've included four options for the construction of the pieced blocks in this quilt. So, from a nine-patch to a four-patch to a scrappy block to a plain block -- all are a five-inch final measurement; before quilt assembly. Each person can choose which option to make; and it does not matter what skill level you are. Each quilt will have a unique story to tell.

Since I love applique more than piecing... whenever it does matter in the finished size of the block; I cut my pieces a bit larger, in order that they end up the proper size. I'm still practicing getting that perfect scant quarter-inch; so until then, I'll do it my own way.

So.... to continue I want to show you how to make a four-patch block using larger squares that can then be cut down to the perfect five-inch block.


FOUR-PATCH BLOCK
1. To begin, cut four 3-inch squares. 2. Stitch them together using a quarter-inch seam allowance, does not matter if it is a regular or scant seam. Carefully press seam allowances; either to one side or open. 3. Next, using a rotary ruler measure block to check size is adequate. 4. To make the cutting part easier; just place the 2.5 inch line along the stitched center seam and trim off each side.

There you go... a perfectly sized five-inch block!! Not much waste; but now it is the perfect dimension required in our pattern instructions.

1. FOUR 3-INCH SQUARES


2. FOUR-PATCH BLOCK

3. MEASURING THE BLOCK


4. CUTTING THE BLOCK


5. BLOCK TRIMMED TO 5-INCH SQUARE


NINE-PATCH SAMPLE
In my nine-patch version, I will be using 4 3/4" blocks; and show you how to adjust the other blocks to fit this quilt design's center section. This can be applied to larger blocks, just as easily. I'm hoping to have it ready in the final week of January.


One thing is for certain... that each project we make will have its own story to tell; from what fabric choices we make to the techniques we employ; and how we decide the pieces are assembled.

If your quarter-inch seam allowances are the perfect measurement, without adjustments; or you need to adjust your cutting measurements, it does not matter. Let us all play this mystery game; at our own skill level and enjoy the journey!

Thank you for joining me...
Happy Quilting!


PS....
The next mystery block available by January 19th.... check your inbox for the arrival of my second email letter that will link you to the next lesson!! Anyone that joined between January 13-17 will be added to my mail-out on January 18th. If this email does not reach you; for whatever reason, you will still be able to find the link at the Weekly Plans page on my website. 


Sunday, January 12, 2014

About the Appliques

In the Applique Mystery Quilt A-long, it's all about the appliques...


Knowing now, that we will create the pieced blocks in a variety of ways; either doing them all at once, or one per week; along with an appliqued block. Let's get to the applique mystery....

It is an applique mystery, because we will be discovering each applique block, one by one, and also where it fits on the quilt top. At times, it may seem like we are working on images that do not relate to each other; however, they are all connected with events or objects we use and/or wish to obtain in our life's journey.

Fabric colors can be chosen in a number of ways: using what's available in our fabric bin; colors we love, colors that match our applique image, or colors that bring in an imaginary theme. [For example: a spotted purple elephant, or everything from one color family.]

The main goal is to not fuss over colors; but to enjoy making each block with the fabrics we have; and remembering it is a scrappy quilt. All these blocks will be brought together when we frame them, with our borders.


APPLIQUE BLOCKS
I like fused machine applique; and if you have not tried this method before, you can check out my two free patterns at my Craftsy store, to give it a try.


Finishing the Edges
Purpose: To stitch around each applique piece to securely attach it to the background fabric.

This can be done with a blanket stitch, applique stitch, or zigzag stitch. For small pieces, I prefer using the zigzag stitch. You can use a combination of stitches on an applique block or select only one stitch type.


Thread Colors
Here, you can choose a number of options: use thread to match the applique piece, one color on all the applique pieces for the complete project, or both. I have used all of these. For the one thread color option; I've used black, dark green, gray, white, and olive green. 


Type of Fusible Web
If you haven't tried any before, check to see what is available in your area. I have always loved using Steam-A-Steam 2; however, with the problem of availability, I had to change. The product I currently use is WonderUnder by Pellon. I had a few issues with it; but have since come to terms with this option.

If you have any questions or suggestions on the applique portion, comment below or reply by email.


Other Notes
Many have had difficulties getting the password to work; or had downloading issues, so I hope we can soon all get this quilt along going.... so we start making our quilt blocks.

I have sent the first email letter (Jan.11), with a new link to a new downloading page; and hope that I can get everyone on this mailing list. Once the quilt along is closed to new participants, it will be easier for me to send a few emails to individual people, if there are still missing lessons, not received.

I will update the pattern download; and hopefully, this will help anyone that joins after January 12, a better way to get to the lessons; until they start receiving the weekly email letter that provides the links to new lessons.

I believe if a pattern is updated; a notification is sent to previous purchasers. But if not, email me; and I will get you on the correct webpage. This new webpage link will be available and stay available for everyone that joins; after Jan.12; until closing on Jan.31. (So no more password issues.)

I've planned on adding all the new addresses for each week, to the mailing list; at the time each new lesson is send out; however, I know that you want to start as soon as possible. This may be helpful.

Once, I get the email letter sent out to include anyone that has joined up over the weekend, I'll also update the pattern download. If anyone that joined between Dec.24 and Jan.10; did not receive this email letter; please email me. I will add you to this next mailing or send you the link, to the correct page.


Happy Quilting.....
Darlee


Sunday, January 5, 2014

Mystery Quilt Begins...

Let me begin by saying, WOW!! It is truly amazing to have so many quilters on this quilt along!! Thank you so much for giving this a try....

It is my hope that you enjoy this journey through the next 17 weeks. Please be assured that your favorite techniques and methods of quilt assembly do not need to be altered; just because you are following this project. Feel free to experiment with different blocks, and while you may try new methods; it is totally fine to adjust any process to fit your present ability.

As quilters, we love the opportunity to share our successes; and when things don’t go as anticipated; there is usually someone available to help. I look forward to sharing this journey with all of you.
 

Quilting Week-by-Week
Each week, we will be making the blocks together. Following this plan, means there will be no finished quilt available to guide you in color selections, optional layouts, etc., and this works out beautifully as a mystery quilt along.

However, I do have another strategy…. Not to show you these things; but to instruct you on using spare blocks that may not be the proper size; as they can still work in this design. As I discovered when I measured my blocks; they were too small. Instead of the required 5”, they were only 4 3/4” square. If only, I had used a scant quarter-inch to sew the seams! If this happens to you, I have an alternate way to still achieve the size needed. (Photos below to illustrate this option.)


Also Note: Only the first set of pieced blocks, need to be accurate in measurement – at 5” square. The rest of the quilt can be stitched with either a scant or regular quarter-inch measurement.  

If you have difficulty sewing a scant quarter-inch seam, or just like the regular quarter-inch seam better; do whichever one you have more success with, or just prefer the most. There are several options offered to allow everyone success, with this quilt project. 

When something goes wrong…. There is generally another way to utilize something that didn’t work or fit in a past project, or plan another approach. This gave me the idea to give several options for the selection of the pieced blocks; in order that everyone can be successful.

I will also be using my too small nine-patch blocks to stitch up this design for you to see a complete quilt top (without the appliques, of course); coming later in January.


Quilt Blocks Too Small
Making quilt blocks on a block of the month or quilt along, or just on your own; and come out with measurements below the required size? What do you do about these results?

Not everyone knows that a lot of quilting designs require a scant quarter-inch seam, now; instead of the regular quarter-inch seam. For me, growing up sewing clothing, the seam allowances were 5/8" wide. So, when I began quilting, I thought sewing with a quarter-inch seam was quite small; and not wide enough to hold the quilt together. And, then in 2012, I learned about the scant quarter-inch seam.

My first thoughts were, why? I already save my fabric scraps, create pretty designs with selvages, save my tiny, tiny scraps for pillow stuffing; and want to use my "fabric stash" instead of buying more fabric, that I don't really need. Even the word itself seems so negative.  But, there comes a time, when it requires at least a try.....

It was just last week, that I did some practicing to try and sew a perfect scant quarter-inch seam. I'm not sure if I've got it, yet. And, then, I don't know if I am truly ready to commit to this. So, it is up to you how to go about this; and if you have trouble with your finished sizes, I'll even show you how to overcome this situation.

WARNING: (If you like lots of rules, then you'll have to make up your own; because I can't seem to even strictly follow my own patterns; let alone expect anyone else too.)

This quilt is scrappy, has lots of options, and will be beautiful; however, you make it!!


Getting Block Size Exact
Okay, so if you are getting perfect results. Congrats! However, if you are having some difficulty, here’s my suggestion to get a perfectly sized pieced block. 

I am not a fan of the scant quarter-inch seam, just yet. So, I tried some sample blocks, to see how I could achieve the proper size, using a regular quarter inch seam. 

To begin, the squares were cut 2 1/8" x 2 1/8" wide; instead of the 2" dimensions, in the pattern. A regular quarter-inch seam was used to stitch all the blocks together. And when, trimming off the excess, there was very little to cut off. But, now this block is 5" x 5" square.

And, that's how you can get this part of the quilt ready for assembly, in week 14. The process is to make one block at a time; this way each block will have the ability to be moved around in the quilt layout, for best results. Also, if you want to mix and match pieced blocks; they do not all have to be the same type.

If you still don’t like the results, either try again; or try another option, to replace this block with another simpler block.


Photos to Measure and Trim Blocks to Proper Size--Using a Regular Quarter-Inch Seam Allowance


Nine-Patch Block

For clarity, these colors were used to allow you to see how the ruler is placed onto the center square. If size is adequate, it is ready to trim. (shown in next photo)


Place Ruler as shown to Measure


As the ruler is correctly placed (in photo above); the top and right sides can be trimmed. Then, readjust the ruler, and trim the other two sides. The block is now the correct size.


Trim off Excess Fabric


Happy Quilting...
Next week, it's about the appliques.

So... if you have questions about the applique blocks, I'll share my thoughts to assist you.


Saturday, January 4, 2014

Where Is That PDF I Downloaded?

STEPS TO DOWNLOADING A PDF

Ready to begin the Applique Mystery Quilt A-long? Then, you'll want to be sure you know how to download the PDF lessons. Here's a quick tutorial on how to do it correctly, if you need it.

      Step 1:  Using Mouse: Right click on the link.

      Step 2:  Select: Save target as
      Step 3:  Choose location to download PDF: desktop (shown here)
      Step 4:  Click: Save

See images below, for more clarification.
 

Step 1: Right click on link


Step 2: Save target as...
 
 
Step 3: Save to Desktop


Step 4: Click: Save
 
 
Your downloaded PDF should now be waiting for you, on your desktop. This is the easiest place to find it. From there: you can move it to another location; rename it; or keep it where it is, for now.
 
Happy Quilting....


PS...
If you would also like a PDF of the PDF Instructions; let me know; and I can place it on my website.


Thursday, January 2, 2014

Piecing Together An Applique Mystery

Piecing -- Applique -- and Scrappy, too ....
Set to begin on January 5, 2014!!

Are you ready to start stitching up your story on this applique mystery quilt along? Instead of using crayons and paper; you'll begin with beautiful fabrics and add recognizable appliqued images that are attached to happy and/or sad memories, and many hopes for the future.

Combining pieced blocks and applique blocks; this quilt will allow total freedom to select a wide range of colors to create a delightfully scrappy quilt, that is set to tell a story -- and being a wall hanging quilt at about 33" x 33" in size; it will stitch up in only 17 weeks.


This Quilt A-Long Project will:
1.)  
Allow total freedom when selecting your colors, any embellishing of the blocks; even has an option in block choices, and the design is flexible to allow changing the final layout, if so desired.

2.)
Allow the beginner, advanced, busy, precise, or creative quilter several main options for creating their own unique quilt.  

3.)
Provide opportunity to work on a quilt along; without the large expense in fabric needs, supplies, and sewing time, as a large project would.
 
4.)
Allow opportunity to use stash fabrics and supplies already on-hand to save money and give opportunity to anyone that wishes to take part in a quilting project without straining their budget.
 
5.)
Begin January 5, 2014 and finish the week of April 27, 2014... making a great gift for someone special; maybe it's YOU!


Soon to be stitching....