Sunday, February 28, 2010

Flower Pounding

Book:
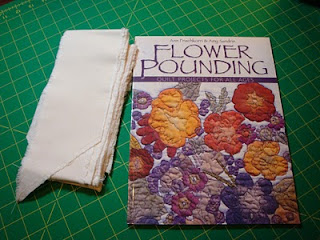
Flower Pounding by Ann Frischkorn and Amy Sandrin

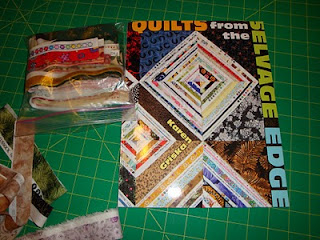
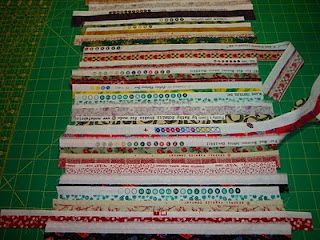
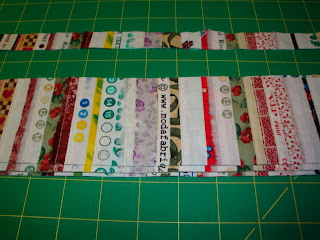
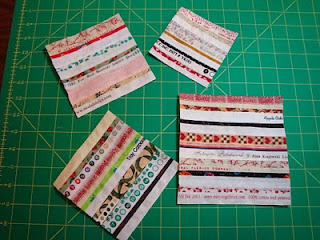
Time to reveal my next project... I choose the project, "Good Chi" on page 54.

I definitely enjoyed this book and am happy that I finally took time to check it out. Also, part of my goal is to actually use quilting books that are in my own library.

Book, Muslin

The instructions were very good and there are lots of photos of other great ideas for projects, in the book's gallery. I will definitely revisit this book, and will enjoy creating more interesting projects as new flowers present themselves to me. But, for now, here are my results....

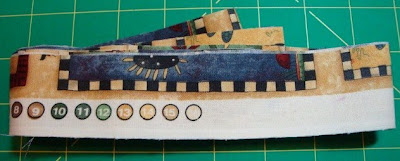
The first step is to treat the fabric so the pigment from the plants you use will be successful in imprinting the fabric. They recommended a 100% cotton muslin for this project. I had several strips of muslin that after treating were about 4" wide. These were sewed together to make it the desired size for printing.


Then, the fun begins...
as you go on an adventure to pick the flowers, leaves, weeds, etc. for your project. This can be as close as your backyard, walk around the block, or local flower shop. What is great about this technique is that it can be done any time of year. If there are no suitable candidates in the outdoors, then your local florist can be a welcome spot. 

WARNING:
This technique can be addictive, very noisy... and your patience is required!!


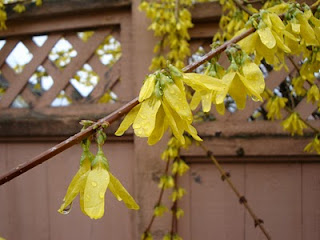
I used different branches and flowers from a variety of trees in the yard. Not all of them are shown, but here are the two main ones. The day I took these pictures, it had been raining. It is good to test them on scraps to see what dye color they will produce. I found it very interesting that what I thought should have printed purple actually printed a pretty green. So, be prepared for surprises!!


Yellow Flowers

 These flower buds printed green


When placing the plant parts onto the fabric, they are taped down with masking tape, and then pounded so the dye can come through the fabric. This is done in stages, and depending on the complexity of the project selected, will take time to complete. You decide how much or how little imprinting will complete the project!!

My suggestion...
is that you have another project to work on while you wait for each stage. If you are not patient enough then you will smudge your fabric if removing the plant remnants before they are completely dry. I found that out!!


The printed fabric - once dried and cleaned up

The design outlined with a black fabric marker


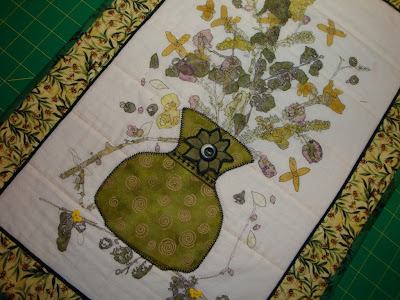
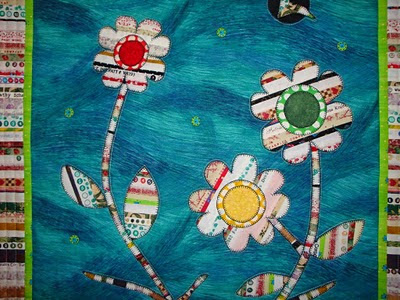
I made a smaller vase as I didn't think I'd have tall flowers to add, so it does look different then the original design. I ended up choosing a plainer fabric for it, as my border is more decorative. It was a hard choice to make and in the end I decorated it will a flower (made with a stencil and the red flower buds) and gold fabric marker.

 
The vase to hold the flowers

After the top was done and the vase added, I still wanted to add some more design below the vase. And, this was a perfect spot for some butterflies. I added a total of 3 yellow butterfly buttons.


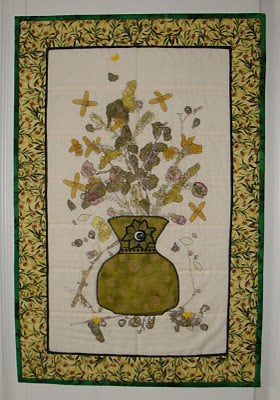
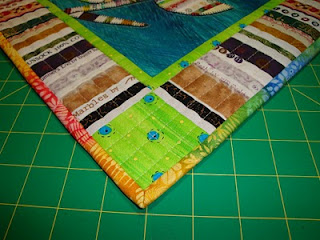
I added a mock binding in a dark green, and used a lighter green for the binding that matches the leaves on the border fabric.

The border and mock piping


Good Chi
Finished size: 15 1/2" x 23"


Next week only...
My next book choice and reveal will take a one week break... so that I can bring you a birthday surprise. Your comments next week, will result in a prize draw for my own eBook, "Quilter's Candy Delights" and a bonus, that I"ll tell you about next week.

My list of featured books is available on my website, check it for more details.

Happy stitching!!

Sunday, February 21, 2010

Spring Has Sprung

DSC05412

If only in your dreams…

Perhaps where you live it is still some months away and you have seen so much ‘white’ that you may want a splash of COLOR.

Here are a few ways to perk up your mood:

  • If you are into gardening, check out the new seed catalogues to dream up your next garden plan for the upcoming season. I love this seed company, but I know there are many others.

  • Or.. buy yourself a bouquet of flowers for your home, to help you remember how beautiful and uplifting they are so you can still enjoy the remainder of the winter season. Why wait until Mother’s Day to enjoy the beauty of flowers!
DSC06667

  • Do you quilt? Then.. it may be the perfect time to quilt up a bouquet of flowers to bring springtime into your home, even if it doesn’t seem like it’s ever coming back.
tulip quiltTulips In Bloom  (34" x 24”)

I designed and made this quilt in 2006 and it is available as a downloadable ePattern on my website. If you’re interested in receiving it for FREE this week, mention it in your comment so I can reach you by email.  Otherwise,  no mention is necessary, if you just wish to leave a comment on this post.

FOURTH PROJECT - FEBRUARY 2010:

flower pounding
My fourth project will be shared next week...
Flower Pounding/ Ann Frischkorn & Amy Sandrin
ISBN: 1-57120-116-5 /

Enjoy your quilting adventure for... 2010!!

Sunday, February 14, 2010

Selvage Quilts

Book:
QUILTS from the SELVAGE EDGE by Karen Griska

Okay... time has come to share my review from this book and reveal my finished project. My main reason for its inspiration is that is takes something that we used to discard from our fabric (the selvage edges) and with this technique we can create beautiful projects!

I am not sure where I discovered it, but when my mouse clicked onto Karen's selvage blog, I was truly inspired. I ordered the book before Christmas and it arrived about 3-4 weeks later. Then it was time to make the decision on which project I would choose to make...

Book, Selvages

Here is how it unfolded:

First, I paged through the book from back to front, and then read it completely from front to back. Deciding on a project, can sometimes be the hardest part of the process. But, of course, to make any of the quilts in the book, it was recommended to have a one-gallon plastic storage bag full of selvages. This I did not have. So, what do I do... wait until I have enough or just jump in and have some fun.

I'd say, "why wait" for anything fun? Do it now!! Therefore, since I didn't have enough selvages, for a project from the book, this time, it shouldn't stop me from making a selvage quilt. Right?

So, I took out my small ziploc bag of selvages that I had and followed the basics in the book. Oh, such FUN, indeed. Since I did not have many selvages, I decided to see what developed!!  A small quilt project is a great way to experiment and try out a new technique. Here I go...

My inspiration came from the quilt called, "Glass Tumbling Blocks". It has two borders and one is done with selvages. So, this was where I began. I figured I had enough for a border and so I made some long strips and some squares. At that point I didn't know what I'd put in the center or anything else about what I'd make. However, the idea soon came to me and this is why I made the following blocks.


My long block

Block cut into strips

At first glance, the long block with all its messy ends didn't look very interesting. However, it transformed before my eyes, after I trimmed the sides and cut it into the four strips that I wanted. I also had a narrow strip leftover. Then, I also made four small squares, as shown below.

Small squares

Instead of using the selvages in an inner border, as the quilt project showed, I decided to use it for the main border and used the remaining narrow selvage strip for the flower stems. The circles (flower centers) were left over from another project I had made several years back. The polka dot fabric I received from my mother's fabric stash that were bought many, many years ago. The bird and leaves came from the scraps that resulted from the cutout flowers. The small circles, green with blue center (in the background) are from the fabric used in the narrow inner border and quilt outer corners. I used black embroidery stitches to sew on the black lines.

I named the quilt, "Garden's Edge". It was such a fun quilt to create and will enjoy making more selvage blocks, in the future.

Those squares became flowers!

The selvage blocks turned into this design!

Binding

My suggestion: If you don't have enough selvages for any of the projects, just try out some of the selvage blocks following the instructions under "The Basics" section. That way you get a feel for how the technique works, make blocks as you can until you have enough blocks to make a complete quilt.

After all, as I figured, once I've completed my 2010 quilt challenge, I will have plenty of selvages to revisit this book and make one then. The selvages that I collected from my fabric scraps drawer were done after I had finished my project. So, my supply is starting to grow!!

************************

Close-up of the flowers


My Selvage Quilt: "Garden's Edge"
(Finished size: 25" x 25")


I have been a fan of "green" living and contributing to creating a more beautiful world for all to live for quite a few years now. For me, it is uplifting to know that I can play a small part in this way by following the 3R's of reduce, reuse and recycle. I believe we can all be responsible and caring citizens of the place we call home.

Now, I realize we all do this in a multiple of ways and when I discovered a new way to use fabric scraps, well, that was just plain fantastic. I do love shopping at fabric and quilt shops but if one already has a whole cabinet full of beautiful fabrics, one should start using them. Anyways, that is my personal goal this year and I am enjoying the process, thus far.

I certainly look forward to creating more selvage quilts. This is my first quilt made from selvages. I did make six mini Christmas stockings in 2009, as I awaited my copy of the book with anticipation. To view the stockings, go to this blog and type into the blog search box, "Christmas stockings" to see those projects.


Next week...
My next book choice and then a reveal the following week. If you wish to see what books are being featured you can also check out my website for more details.

Happy stitching!!

Sunday, February 7, 2010

You Are Doing, What?

Have you ever been told that you can't do what you have in mind and then go and do it anyways, or find a new way to use something we think is unusable? And, then everyone is amazed afterwards...

Well... if you have, I am thankful for your determination to bring change to allow new ideas to blossom. Yes, there are proper ways to do everything. And, for most of us usually the way we've been taught to do that thing, is how we keep doing it. But... why not change it or create new ways to doing that thing?

Last year, I discovered one such wonderful idea... and it has inspired me and many other people, as well. For a look, you may check out Karen's blog for lots of inspiration. Now, when others say to you, "You can't do anything with that?" you can smile, and say, "Just watch me!!"

[Selvage edge cut 1 1/2" wide]

Anyways, that is how I view quilting today, because of the creativity and new techniques, it is just plain FUN to be a part of this adventure and such a great opportunity to learn and challenge one's own abilities.


BEING RESOURCEFUL

My supply of selvage edges is very small, so far. However, I look forward to collecting more selvages as I quilt my way through 2010. It will give me opportunity to add to my selvage pail. One place that I did think of looking was in my fabric scrap drawer. And, it surprised me that I found all these just waiting for me to discover...

[Selvages - from fabric scrap drawer]

The fabric selvage edges will be used to create squares, triangles, and long blocks to be used in creating unique quilts.

Have you ever thought selvages from fabric could be so delightful? For my next project, I will show you how I used my selvages and which projects from the book inspired my quilt design. This book will inspire you to use selvages to create beautiful quilts from the fabric edge that once were discarded and deemed useless.

DEFINITION:
Selvages: the edge of woven fabric finished so as to prevent ravelling, often in a narrow tape effect, different from the body of the fabric. (dictionary.com)

NEW CONCEPT:
Selvages: cut off this fabric strip (1 1/2") and save for creating colourful and unique quilting projects

Therefore... continue to have fun while discovering new ways to create beautiful projects and bring your creativity to a new level for all to enjoy!!


THIRD PROJECT - FEBRUARY 2010:


My third project will be shared next week...
Quilts from the Selvage Edge/
Karen Griska
ISBN: 978-1-57432-957-5 /


Enjoy your quilting adventure for... 2010!!